How Do You Remove a Broken Screw From Wood
If a screw breaks in wood, first expose and stabilize the area, then decide if the stub is exposed, recessed, or flush; grip exposed stubs with locking pliers and twist out, file or cut a slot for a screwdriver on rounded ends, or drill a centered pilot hole and use an extractors/easy‑out for recessed stubs. Apply penetrating oil or heat for rusted screws and reinforce soft wood before drilling. Keep tools steady and go slowly — continue for step‑by‑step techniques and repair tips.
How to Remove a Broken Screw From Wood: Fast
If a screw snaps off flush with the wood, don’t panic—you can get it out quickly with the right tools and a steady hand.
First, expose the broken shaft, working with wood grain patterns to avoid splintering.
Carefully reveal the broken shaft, following the wood grain to prevent splintering.
Grip with a tiny extractor or reverse drill at correct screw head angles.
Turn slowly, back the fragment out, then clean the hole for a new screw.
When to Pull the Screw vs. Leave It in Place
After you’ve exposed and removed a broken screw, decide whether to pull any remaining fragment or leave it in place based on function and risk.
If the screw supports weight, seals, or could corrode, remove it; otherwise leaving a flush fragment can be fine.
Consider environmental impact of removal methods and respect historical screw techniques when restoring antiques to avoid damage.
Check How the Screw Broke: Exposed, Recessed, or Flush
Look at how the screw broke before you start—whether the tip is exposed, the head is recessed, or it’s flush with the surface will change your approach.
If the tip sticks out, you can usually grab or back it out.
A recessed head may need drilling or an extractor.
When it’s flush, you’ll likely have to create purchase or use extraction tools designed for flush screws.
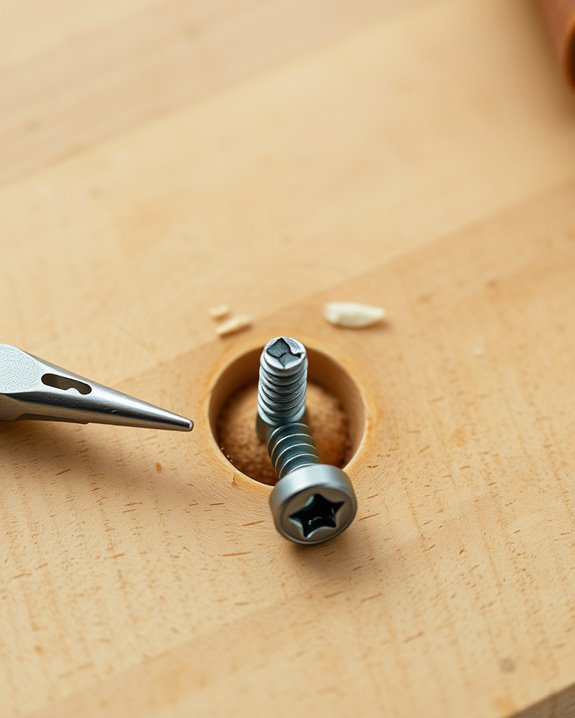
Exposed Screw Tip
When a screw breaks and the tip is exposed above the wood’s surface, you’ve got the easiest removal scenario: you can grab the protruding end, back it out, or use simple tools like pliers, a vise-grip, or an extractor for a better bite.
If the exposed screw has a sharp tip, clamp firmly, turn counterclockwise, and protect the wood with tape or a pad.
Recessed Screw Head
How did the screw break below the surface? If the head sits recessed, you’ll need a small extractor or drill carefully to avoid damaging decorative finishes or tearing the wood grain.
Clear debris, work slowly, and use tape or a plug cutter if necessary to center extraction. After removal, fill the recess, sand with the grain, and match stain to preserve the finish.
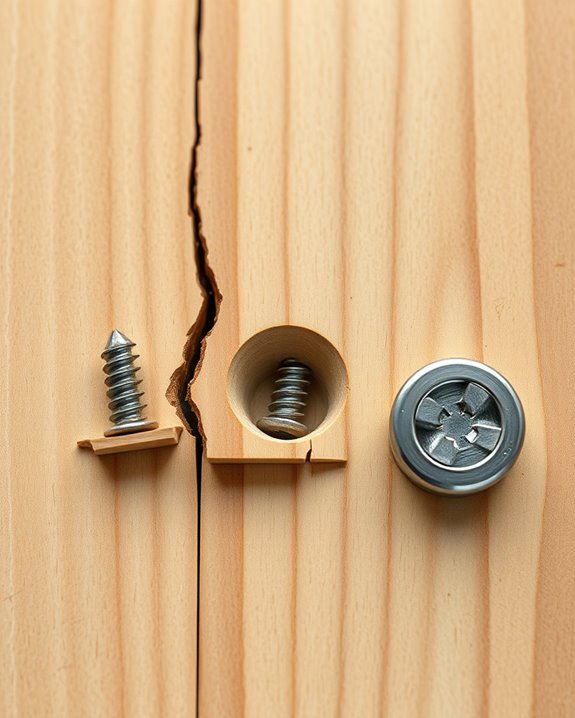
Flush With Surface
If the screw broke flush with the surface, you’ll first need to determine whether any of the shank is still protruding or if it’s entirely buried in the wood.
If slightly exposed, grip with pliers or use a small extractor.
If buried, drill carefully with a bit smaller than the screw core.
Protect decorative finishes and follow the wooden grain to avoid tear-out.
Tools to Remove a Broken Screw in Wood
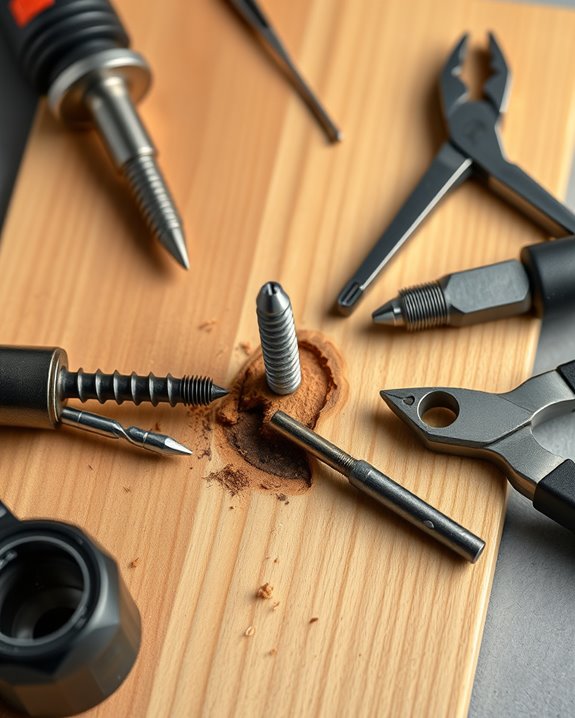
Before you start, gather a few reliable tools so you can work quickly and avoid making the damage worse: you’ll want a good set of screw extractors, a drill with matching bits, locking pliers (vise grips), a center punch, and a small chisel or thin flathead for clearing debris.
Consider screw material and wood grain when selecting extractor size and drill speed; choose corrosion-resistant extractors for rusted screws.
Safety Gear and Precautions Before You Start
Because you’ll be working with rotary tools, metal, and splinter-prone wood, put on safety glasses, heavy-duty gloves, and a dust mask before you touch anything.
Wear safety glasses, heavy-duty gloves, and a dust mask before handling rotary tools, metal, or splinter-prone wood.
Check your workspace for stable lighting and clear debris.
Use hearing protection if power tools run loud.
Inspect tools for damage and secure the workpiece.
Follow basic safety precautions and wear appropriate protective gear throughout the job.
How Wood Type Changes Your Removal Plan
How hard is the wood you’re working with? You’ll adjust technique for hardwoods versus softwoods:
Hardwood resists pilot extraction and may need drilling around the broken bit, while softwood can crush if you drag tools across the wood grain.
Check for screw corrosion—rust weakens metal and can bind fragments.
Match tool size and speed to avoid splitting or pushing the fragment deeper.
Surface, Recessed, or Flush: What the Depth Tells You
When a broken screw sits proud of the wood, recessed below the surface, or flush with it, the depth immediately tells you which extraction path will work best and how much risk you’re taking with the surrounding wood.
If it’s surface level you can grab or twist it out.
Flush calls for cutting or gripping tools.
A recessed depth often needs drilling or a small extractor, so proceed carefully.
Spotting a Stripped Head and Why It Matters
If the screw head looks rounded, chewed, or its driver slot’s edges are mashed down, you’re likely dealing with a stripped head—one that won’t accept a normal bit and will complicate removal.
You should check Screw head visibility and Tool compatibility quickly:
- Inspect lighting and angle
- Test bit fit gently
- Note tool slippage risk
- Plan extraction method
How Rust Alters Your Removal Approach
Because rust eats away metal and binds threads, it changes both why and how you’ll remove a screw. You’ll assess Rust influence to know if threads won’t turn and if extraction risks fragmenting wood.
Corrosion effects often require penetrating oil, longer soak times, gentle heat, and slow, steady turning to avoid worsening damage. Work patiently and inspect progress frequently.
Use Pliers When the Screw Stub Sticks Out
Once the screw stub protrudes enough to grab, reach for a pair of locking or needle-nose pliers and get a solid grip close to the wood. You’ll avoid crushing the head and can feel the screw diameter while working with the wood grain.
When the screw sticks out, clamp it with locking or needle-nose pliers close to the wood and turn slowly.
- Remove debris.
- Steady the board.
- Grip firmly.
- Twist slowly, easing the stub free.
Use Locking Pliers to Back Out a Broken Screw
When a broken screw won’t budge with regular pliers, grab a pair of locking pliers to get a firmer, more controlled hold.
Clamp them close to the wood so you back the screw out straight and avoid tearing the grain.
Lock the jaws on the exposed stub, apply steady torque, and back it out slowly, feeling the screw threading bite.
Protect the wood grain as you work.
When Needle‑Nose Pliers Are the Right Choice
If the broken screw leaves a thin, protruding stub you can grasp, reach for needle‑nose pliers — they give precise access in tight spots and let you twist straight without widening the hole.
Use a steady gripping technique, clamp firmly, and pull while turning.
Grip steadily, clamp tight with needle‑nose pliers, then pull while turning to ease the broken screw free.
Steps:
- Position pliers
- Clamp close to wood
- Twist counterclockwise
- Extract slowly
Widen a Shallow Stub So Pliers Can Grip
Before you reach for the pliers, make the stub easier to grab by widening its top just enough so the jaws can close around it.
Use a small rotary tool, countersink, or sharp awl to carefully remove wood grain fibers and expose screw threading without digging deep.
Work slowly to avoid splitting the wood and preserve surrounding grain for a clean extraction.
File a Gripping Edge With a Flat File
You’ll use a flat file to create a clean, flat edge on the screw stub so pliers can get a solid bite.
Pick a file with medium-coarse teeth and a comfortable handle for control.
Clamp the wood and hold the screw steady while you file to avoid slipping or damaging the surrounding surface.
Create A Flat Edge
When the screw head is too rounded for a screwdriver, file one side flat with a coarse flat file to give your driver something to bite into.
You’ll create a new gripping face for removal and avoid splitting the wood. Think like Creative woodworking or Custom screw design—modify carefully.
- Stabilize work
- File flat
- Test driver fit
- Remove slowly
Choose Proper File
If the screw head’s too mangled for a driver, pick a flat file that matches the screw’s size and tooth pattern so you can cut a clean, durable gripping edge. You’re Choosing proper file by testing on scrap, then file straighter grooves. Avoid overcutting; consider Using a precision saw to define edges before filing.
| Tool | Purpose |
|---|---|
| Flat file | Shape grip |
| Scrap | Test fit |
| Saw | Define edge |
| Clamp | Stabilize |
| Brush | Clean filings |
Secure Screw And Wood
Before you start filing, firmly clamp the wood and the broken screw so nothing shifts. You’ll file a gripping edge with a flat file, avoiding screw corrosion damage and preventing wood splitting.
Follow steps:
- Clean debris around the break.
- Choose a coarse flat file.
- File straight into the screw head.
- Test for bite with pliers, then extract carefully.
Use a Rubber Band and Screwdriver for Stripped Screws
Although a stripped screw can feel hopeless, you can often get the head to bite again by placing a wide rubber band over it and driving the screwdriver into the band so it fills the gaps and gives the driver extra grip.
Use Rubber band techniques and minor Screwdriver adjustments—apply firm, steady pressure while turning slowly. If it slips, try a thicker band or a slightly larger bit for better engagement.
Tap the Screwdriver to Loosen a Stuck Screw
Want a quick way to break a stuck screw free? You tap the screwdriver handle lightly while turning to jar seized threads without harming the wood grain or altering screw color visibility.
Steps:
- Fit driver snugly.
- Tap handle with a hammer.
- Turn gently clockwise then counterclockwise.
- Repeat until it loosens, keeping pressure steady and controlled.
Use a Manual Screw Extractor (Easy‑Out) Safely
Pick an extractor that matches the broken screw’s size and thread type so it bites cleanly without widening the hole.
Drill a small, centered pilot hole straight into the screw shank to give the extractor a firm purchase.
Go slowly and keep the extractor aligned to avoid snapping it or damaging the surrounding wood.
Choose The Right Extractor
Which extractor will actually bite into the broken screw and let you turn it out?
You’ll pick based on screw material and wood grain. Match size and flute type, then test grip.
- Small extractor for fine screws
- Coarse extractor for softwood bite
- Hardened steel for stubborn alloys
- Tapered reverse thread for maximum hold
Drill Pilot Hole Carefully
Before you start drilling, mark the screw’s center and clamp the wood so the extractor stays straight; a crooked pilot hole will make the easy‑out bind or break. You’ll drill slowly, match bit size to the extractor, and avoid cutting across wood grain. Orient to screw threading, back out debris, and use steady torque to prevent breaking the easy‑out.
| Step | Bit | Tip |
|---|---|---|
| 1 | Center | Clamp |
| 2 | Pilot | Slow |
| 3 | Extract | Reverse |
Use a Tapered Extractor With a Drill
When a screw head has stripped or broken off, using a tapered extractor with a drill gives you controlled, reliable removal.
You’ll align the tool with wood grain alignment, add light screw lubrication if needed, and drill slowly to engage the extractor.
Steps:
- Center extractor.
- Tap gently.
- Reverse drill slowly.
- Remove screw and clean the hole.
When to Drill a Pilot Hole Into the Broken Screw
If the screw head is flush or stripped so you can’t grab it, you’ll need to drill a pilot hole to give an extractor something to bite.
Choose a drill bit slightly smaller than the extractor’s tip and centered on the broken screw to avoid widening the hole in the wood.
Go slow and steady so you don’t wander or split the surrounding material.
When To Drill
Because the head is stripped or the screw sits below the surface, you’ll need to decide whether drilling a pilot hole into the broken shaft is the right next step.
Check screw threading and wood grain direction, then assess damage and access.
- Can’t grip screw
- Deeply embedded
- Minimal surrounding wood
- Nearby grain runs stable
Drill Bit Selection
As you prepare to drill a pilot hole into a broken screw, pick a bit that matches the screw’s shaft diameter and the task at hand.
Choose a high-speed steel or cobalt bit for screw corrosion or hardened metal.
Use a smaller bit for gripping threads, larger for extraction tools.
Align perpendicular to wood grain, go slow, keep steady pressure to avoid splitting or wandering.
Pick Drill Bit Sizes for Common Screw Gauges
When you’re choosing a drill bit for a common screw gauge, match the bit to the screw’s core (not the threads) so the broken shaft clears without widening the hole.
Use drill bit sizing charts and these quick guides:
- #4–#6: 1.5–2.0 mm
- #8–#10: 2.5–3.0 mm
- #12–#14: 3.5–4.0 mm
- Wood screws: pilot drill ~ core diameter
Drill Speed and Pressure for Metal Screws in Wood
When removing a broken metal screw from wood, you’ll want to run the drill at a moderate RPM—typically 1,000–2,500 for small screws and lower for larger or harder metals.
Apply steady, controlled pressure so the bit bites without skidding or overheating, easing up if you feel chatter.
For different screw sizes, reduce speed and increase patience as diameter and hardness go up.
Optimal RPM Range
Although drill bits and screws vary, you’ll get the best control and least damage by running a standard corded drill between about 800 and 1,500 RPM for most metal screws in wood.
Backing that speed with steady, moderate pressure helps ensure the bit bites without wandering or overheating.
Consider:
- Match RPM to screw material.
- Slow for hard alloys.
- Faster for soft metals.
- Mind wood grain direction.
Appropriate Drill Pressure
Because the right pressure links speed to control, you want steady, moderate force—enough that the bit bites without stalling, but not so much that it skids, splits the wood, or snaps the screw.
Maintain slow RPMs for corroded metal. Increase pressure slightly if the screw shows screw corrosion but back off around visible wood expansion to avoid crushing fibers.
Pause to clear debris.
Adjusting For Screw Size
If you’re working with a fine, short screw, run the drill at lower RPMs and keep steady, light pressure so the bit centers without tearing the wood.
For larger metal screws, increase speed and firm pressure, but watch the screw head and wood grain.
- Match bit to screw head.
- Start slow to find center.
- Increase RPM gradually.
- Reduce pressure near surface.
Use a Left‑Hand Drill Bit to Remove a Broken Screw
When a screw head has sheared off, grab a left‑hand drill bit and reverse‑drill into the broken shank; the bit’s counterclockwise rotation often bites into the metal and unscrews the fragment as it cuts. You’ll wear eye protection, clamp the piece, and proceed slowly to protect the wood and follow DIY projects and woodworking safety best practices.
| Step | Tool | Tip |
|---|---|---|
| 1 | Left‑hand bit | Start small |
| 2 | Clamp | Stabilize |
| 3 | Slow drill | Let bit bite |
| 4 | Pliers | Finish removal |
| 5 | Clean | Inspect hole |
Enlarge the Hole to Remove the Screw Shank
Although you’ve probably tried extracting the broken shank, enlarging the hole can let the fragment turn or be pushed free without damaging the surrounding wood. You’ll work with the wood grain and loosen screw threads by carefully widening the entry.
Follow steps:
- Mark center.
- Use small pilot bit.
- Gradually increase drill size.
- Clear debris and test turning.
Cut a New Slot Across the Screw With a Rotary Tool
Before you start, clamp the piece and fit a thin cutting disc or carbide bit to your rotary tool so you can cut a clean slot across the broken screw head; steady, shallow passes will prevent overheating and keep the cut aligned with the existing screw axis. Mind screw head design and wood grain orientation to avoid splitting.
| Tool | Speed | Tip |
|---|---|---|
| Rotary | Medium | Thin disc |
| Bit | Low | Carbide |
Use a Dremel or Metal Wheel Safely on Screws
If you’re using a Dremel or metal cutting wheel on a broken screw, wear eye and hand protection, secure the workpiece, and pick a wheel sized for the screw head so you can make controlled, shallow cuts.
Follow safety precautions and tool maintenance routines to prevent sparks and wheel failure.
- Work slowly
- Clamp firmly
- Use short cuts
- Inspect wheel
Welding a Nut to a Broken Screw: Pros, Cons, Risks
When you weld a nut to a broken screw, you’re creating a new head you can grab with a socket or wrench, which can make extraction straightforward for thick metal or hardened screws that resist other methods. You must consider Welding safety and Nut compatibility; welding risks include heat damage, warping, and bad joints. Use PPE and test fit.
| Pros | Cons | Risks |
|---|---|---|
| Strong grip | Heat transfer | Wood scorch |
| Works on hardened screws | Requires skill | Poor weld failure |
| Quick removal | Needs proper nut size | Electrocution |
Heat the Screw to Loosen Rusted Threads
If the screw is rusted in place you can apply heat to expand the metal and break the bond, but you’ll need to do it carefully. Use a soldering iron or heat gun and keep the flame or tip off the surrounding wood to prevent scorch marks.
Protect the wood with a wet cloth or heat shield and work in short bursts so you don’t cause damage.
Apply Heat Safely
Although heat won’t fix a stripped head, it can loosen rusted threads enough for you to back the screw out. Use controlled heat application and follow safety precautions so you don’t ignite the wood or burn yourself.
- Wear gloves and eye protection.
- Use a soldering iron or heat gun briefly.
- Apply heat at the shaft, not the wood.
- Let metal cool slightly before turning.
Prevent Wood Damage
After loosening rusted threads with controlled heat, take steps that protect the surrounding wood while you extract the screw.
Shield the wood grain with thin metal or a scrap board clamped tight, cool the area to stop scorching, and apply penetrating oil to combat screw corrosion.
Use padded pliers or a screw extractor gently to avoid splitting or gouging the surface.
When Penetrating Oil Helps and How Long to Wait
When a broken screw is rusted or seized in place, penetrating oil can loosen trapped threads and make extraction far easier. You’ll use it when screw corrosion binds to the wood surface or metal.
Apply oil, wait, then extract gently.
Apply penetrating oil, let it soak, then carefully back the screw out for easier removal.
- Clean debris
- Apply oil generously
- Wait 15–30 minutes
- Reapply if needed
Stabilize Fragile or Rotten Wood Before Aggressive Removal
Before you start aggressive extraction, check how much of the wood around the broken screw is sound so you know if it can hold pressure.
If the material is soft or crumbling, consolidate it with a suitable epoxy or wood hardener to create a stable grip.
Finally, brace or support the surrounding area so your removal method doesn’t cause further damage.
Assess Wood Integrity
Not sure how solid that surrounding wood is? You should inspect wood grain direction and surface finish for soft spots, discoloration, or blistering.
Check moisture with a probe, press with a screwdriver tip, and tap for hollow sounds.
- Visual scan
- Probe firmness
- Moisture check
- Load test
If damage’s localized, restrict removal to intact areas and avoid spreading decay.
Consolidate With Epoxy
If the surrounding wood feels soft or shows decay, stabilize it with epoxy so it can hold tools and fasteners during extraction.
You’ll clear debris, apply a low-viscosity epoxy for deep epoxy bonding, and let it penetrate.
After cure, sand and do surface sealing to create a solid work area.
This prevents further crumbling and guarantees clean screw removal.
Support Surrounding Area
While you’re prepping to remove a stubborn screw, shore up any soft or rotten wood around it so aggressive extraction won’t cause more damage. You’ll reinforce the supporting structure and limit surrounding damage using targeted steps:
- Clear debris and dry the area.
- Apply wood hardener to soften zones.
- Clamp a backup block for support.
- Let cure fully before extracting the screw.
Use Wood Glue and Packing to Protect the Hole
Once you’ve exposed the broken screw and cleared loose fibers, pack the surrounding hole with a little wood glue and a tight plug of scrap wood or toothpicks to protect the threads and stabilize the area. You’ll respect wood grain direction, reduce screw corrosion risk, and keep edges intact while you plan extraction.
| Tip | Material | Benefit |
|---|---|---|
| Glue | PVA | Stabilizes |
| Packing | Toothpicks | Protects |
| Direction | Grain | Prevents split |
When to Drill Out the Screw and Re‑Tap Threads
When the screw’s head is gone, the shaft is seized, or extraction methods like gripping or drilling a pilot haven’t worked, it’s time to drill out the screw and re‑tap the threads.
You should:
- Assess screw corrosion and wood grain alignment.
- Choose a drill bit slightly smaller than the screw shaft.
- Drill centered, slow, and cool.
- Re‑tap threads to match the original fastener size.
Plug and Redrill a Stripped Screw Hole
If the screw hole’s threads are stripped beyond repair, you can plug it with a snug wood dowel to restore solid holding power.
Glue the dowel in place, trim it flush, then redrill a correctly sized pilot hole for the replacement screw.
Finish and refinish the surface so the repair blends with the surrounding wood.
Plug With Wood Dowels
While you could try other fixes, plugging the hole with a wooden dowel gives you a strong, simple base for redrilling a stripped screw hole.
You’ll match wood grain and consider finish matching.
Steps:
- Drill squarely to clean the hole.
- Trim a snug dowel piece.
- Glue and tap flush.
- Let cure fully before proceeding.
Redrill And Refinish
After the dowel cures, you’ll square the plug, redrill a pilot, and refinish the area so the repair holds and blends with the surrounding wood.
Trim flush, sand smooth, and use matching stain or finish to conceal the repair.
Reinstall the screw, or use a slightly larger fastener for grip.
This step is essential in furniture restoration and proper tool maintenance to guarantee longevity.
Match Dowel or Plug Sizes to Common Screw Diameters
Because dowel and plug sizes need to match screw diameters for a secure repair, you’ll want to choose the closest standard dowel that fully fills the pilot hole left by the broken screw without splitting the surrounding wood.
Account for screw thread patterns and wood grain alignment.
- Measure screw major diameter
- Match standard dowel size
- Test-fit plug depth
- Glue and clamp securely
Install Threaded Inserts After Removing the Screw
Once you’ve removed the broken screw, pick a threaded insert that matches the screw’s diameter and the wood’s density so it holds without splitting.
You’ll want to prep the hole to the insert maker’s recommended size, then drive the insert in squarely to avoid misalignment.
Finally, secure it by seating fully and testing with the desired screw to guarantee a tight, lasting fit.
Choosing The Right Insert
Wondering which insert will hold best in your wood repair? You’ll match insert type to material, load, and hole size, noting screw head design and wood grain orientation. Consider:
- Brass for fine threads and soft woods.
- Steel for high loads.
- Helicoil for stripped metal anchors.
- Threaded hardwood plugs for edge repairs.
Choose based on strength, compatibility, and grain alignment.
Installation And Securing
After you’ve removed the broken screw and cleaned the hole, install the threaded insert so it seats flush and aligns with the original screw axis. Use an insertion tool or driver for steady pressure, tap lightly if needed, and apply adhesive if the wood is soft.
Let cure fully, trim any protrusion, then test fit fasteners. This guarantees durable joins for woodworking projects and creative decor.
Extractor vs. Plug Repair: Which to Choose
When you’re facing a broken screw in wood, choosing between an extractor and a plug repair comes down to how much damage you’ll accept and how permanent you want the fix to be. You’ll weigh Screw material and Wood finish, tool access, and time.
- Extractor: preserves original hole.
- Plug: stronger structural repair.
- Time vs. permanence.
- Finish impact matters.
Finish a Repaired Hole for a Clean Appearance
After filling the hole, match the wood grain and color so the repair blends with the surrounding surface.
Sand the area smooth, feathering the edges to remove any ridges.
Finish with a suitable sealer or topcoat to protect the patch and give a uniform appearance.
Match Grain And Color
If you’re aiming for a seamless repair, match the wood grain and color before you finish the hole so the repair almost disappears. You’ll focus on Color matching and Grain blending to hide the fix.
Steps:
- Select stain closest to original.
- Test on scrap.
- Apply thin layers, building tone.
- Use fine brush to align grain direction and feather edges for a seamless look.
Sand And Seal Surface
Once you’ve matched grain and color, sand and seal the repair to blend it with the surrounding surface and protect it from wear.
After surface preparation, sand progressively with fine grits until smooth. Wipe dust, then apply appropriate sealing techniques—thin coats of varnish, shellac, or polyurethane.
Let each coat dry and lightly sand between coats so the patched area matches the original finish.
Avoid Splitting Wood While Extracting a Screw
When you pull a broken screw from wood, take steps that protect the surrounding fibers so the hole doesn’t crack or tear out. You’ll preserve wood finishing and limit damage from screw corrosion.
Follow precise steps:
- Back out gently with proper bit.
- Drill small pilot around core.
- Use extractor minimally.
- Clamp to stabilize before prying.
What to Do If the Driver Bit Keeps Camming Out
If the driver bit keeps camming out, first make sure the bit is fully tightened in the chuck and you have a firm grip on the tool.
Switch to a fresh, correctly sized bit or use an impact driver to deliver more torque without slipping.
If that still fails, switch to a screw extractor designed for stripped heads to remove the broken screw.
Tighten Bit And Grip
Although the driver bit keeps camming out, you can still gain purchase by tightening your grip and securing the bit properly.
Focus on aligning the bit with the screw thread and following the wood grain.
Steps:
- Clamp the workpiece.
- Use the correct-size bit.
- Apply firm downward pressure.
- Turn slowly, re-seating if it slips.
Use Impact Or Extractor
If the bit still cams out despite tightening your grip and securing the workpiece, switch to a tool that delivers more controlled force: an impact driver or a dedicated screw extractor.
Use low-speed impacts to reduce cam-out, matching extractor size to screw material.
Protect the wood finish with tape or a sacrificial pad.
Work steadily, reversing direction as needed until the broken screw releases.
Remove a Broken Screw From Finished Furniture
When a screw snaps flush in finished furniture, you’ll want to remove it without damaging the surface or surrounding wood. Start by evaluating how much of the screw is exposed and whether the finish can withstand drilling or heat. Use furniture polish to protect edges and keep wood stain intact.
Steps:
- Mask area.
- Center punch.
- Drill small pilot.
- Extract carefully.
Removing a Broken Screw From Hardwood vs Softwood
Hardwood and softwood need different approaches when you’re removing a broken screw, so you’ll want to adjust your technique accordingly.
In hardwood, you’ll often rely on precise drilling, heat, or screw extractors to avoid splitting dense fibers.
In softwood, you can be gentler—use clamping, backing blocks, or careful twisting to pull the screw without crushing the grain.
Hardwood Removal Techniques
Because hardwood fibers are denser and less forgiving than softwood, you’ll need different tools and techniques to extract a broken screw without causing splitting or tear-out.
Focus on wood grain and potential screw corrosion. Use precision and patience:
- Center-punch and drill small pilot.
- Use an extractor set designed for hardened screws.
- Apply penetrating oil for corrosion.
- Tap gently with hardened punch.
Softwood Extraction Tips
Softwood behaves differently, so you’ll need to adjust your approach when removing a broken screw: its looser grain lets you use less aggressive extraction and more forgiving tools.
Start with a center punch, try pliers or a screw extractor sized small, and avoid overdrilling.
Remember Softwood durability varies; don’t trust Extraction myths that recommend heavy force.
Work gently to prevent splitting and repair easily if needed.
Handle Screws Broken Near Hinges or Hardware
When a handle screw shears off right at a hinge or other hardware, you’ll need steady access and the right small tools to avoid damaging the surrounding finish or the hardware itself. You’ll combine Historical techniques with Modern tools, working carefully:
- Remove hardware if possible.
- Use a center punch.
- Try a tiny extractor.
- Tap out with a pin and pliers.
Remove Long Broken Screws From Deep Pockets
If a screw has snapped deep in a recessed pocket, you’ll need tools that reach and grip without chewing up the surrounding wood—long, thin screw extractors, flexible drill bits, and specially shaped hooks are your best bets.
You’ll work slowly, use light taps, and back out metal shavings.
If extraction fails, consider creative alternatives like threaded inserts or decorative covers to hide and secure the area.
Salvage a Project When the Screw Hole Is Damaged
Once a screw hole’s threads are stripped or the wood has split, you can still save the project by rebuilding the attachment point rather than starting over. You can:
When screw holes fail, rebuild the attachment point—don’t start over; repair and reinforce instead.
- Fill with wood glue and matchstick plugs to restore screw thread.
- Use a larger pilot hole and longer screw.
- Insert a hardwood dowel glued in place.
- Reinforce with a metal plate across the wood grain.
Prevent Broken Screws: Best Driving Technique
Although driving screws can seem straightforward, using the right technique prevents breakage and keeps your work clean. You’ll match screw material to the task, predrill where wood grain is tight, keep the driver straight, and use steady speed and pressure to avoid snapping heads or shafts.
| Tip | Action | Why |
|---|---|---|
| Predrill | Yes | Protects wood grain |
| Align | Straight | Prevents cam-out |
| Speed | Steady | Reduces stress |
Screw Types That Are Less Likely to Break
Picking the right screw goes a long way toward preventing breaks, so after you’ve practiced proper driving technique you’ll want to choose fasteners designed to handle the job. Consider:
- Hardened steel or stainless for strength.
- Screws with coarse vs fine thread pitch variations to match material.
- Shanked screws to reduce shear.
- Choose appropriate screw head styles for full bit engagement to avoid cam-out.
Choose the Right Replacement Fastener After Repair
After you’ve removed the broken screw and prepped the hole, choose a replacement fastener that matches the load, material, and hole condition so the repair holds long-term.
Pick proper screw head styles for access and torque, and match screw size and thread to wood grain patterns to avoid splits.
Consider length, corrosion resistance, and whether a washer or insert improves grip in damaged holes.
Maintain Tools to Reduce Broken‑Screw Incidents
If you want to cut down on broken screws, keep your drivers, bits, and drills sharp, clean, and properly adjusted so they bite consistently and don’t cam out. You should:
- Inspect and replace worn bits regularly.
- Use screw lubrication for stubborn threads.
- Keep chucks tight and drills calibrated.
- Employ Magnetic tools to steady screws and reduce slips.
Troubleshooting: Common Failures During Extraction
Even with well-maintained tools, extraction can go wrong in predictable ways, and knowing those failure modes helps you respond fast. You’ll strip heads, break extractors, or tear the wood grain.
Stop, reassess, and switch bits or methods to protect DIY decor and prioritize woodworking safety. Avoid excessive force, secure the piece, and consider drilling slightly off-center to regain purchase.
Quick Checklist: A Step‑By‑Step Decision Map for Removal
When a screw snaps in wood, follow a short decision map that guides you step by step so you choose the least destructive option first.
Assess screw type and visible shaft; check surrounding wood finishes for damage.
Then:
- Try extraction with pliers.
- Use reverse drill bit next.
- Apply screw extractor carefully.
- Patch and refinish if needed; match finish.
Frequently Asked Questions
Can a Broken Screw Cause Structural Failure in a Load‑Bearing Joint?
Yes — it can. You’ll risk failure if the screw material’s weakened or the joint design’s compromised, especially under cyclic or shear loads; inspect fastener strength, redistribute loads, and replace or reinforce the connection promptly.
How Do You Prevent Rusted Screws in Outdoor Wood Projects Long‑Term?
You’ll prevent rusted screws long-term by using rust prevention strategies: choose stainless or galvanized fasteners, apply protective coatings like epoxy or marine varnish, seal joints, use stainless washers, and maintain periodic inspections and touch-ups.
Can Woodworm or Pests Affect Removal Strategy for Broken Screws?
Like inspecting a ruined tapestry, yes — you’ll adjust technique when pest damage or woodworm impact weakens grain; you’ll support surrounding wood, use gentle extraction to avoid collapse, and reinforce or replace compromised sections afterward.
Is It Safe to Use Chemical Solvents on Finished Furniture Surfaces?
You shouldn’t; chemicals can damage finishes, so you’ll avoid harsh solvents. Prioritize chemical safety: test in an inconspicuous spot, use manufacturer-recommended cleaners, wear gloves and ventilation, and consider professional restoration for valuable furniture finish.
When Should I Call a Professional Rather Than Continue DIY Extraction?
When things feel like Pandora’s box, call a pro if the screw’s deep, near a joint, or you’re outmatched; they’ll prevent damage. Don’t risk it—use DIY tips sparingly and follow tool recommendations for simpler extractions.
Conclusion
Think of the broken screw as a splintered oar in a small boat — you can lash it and keep paddling or pry it out and trade for a stronger blade. You’ll know when to tug, drill, or leave it as ballast. With the right tools, calm hands and a clear decision map, you’ll either restore steady rowing or steer around the hazard. Either way, you finish the trip wiser and better equipped.