Can I Screw Into Tile
You can screw into tile if you take precautions and anchor into solid backing or studs rather than relying on the tile alone. Use the right bits (carbide for ceramic, diamond for porcelain), mark and tape the spot, drill slowly with cooling, and use anchors rated for the substrate and load. Avoid cracked or brittle tiles and distribute heavy loads across studs or mounting plates. Keep going to learn step‑by‑step techniques, tool choices, and troubleshooting.
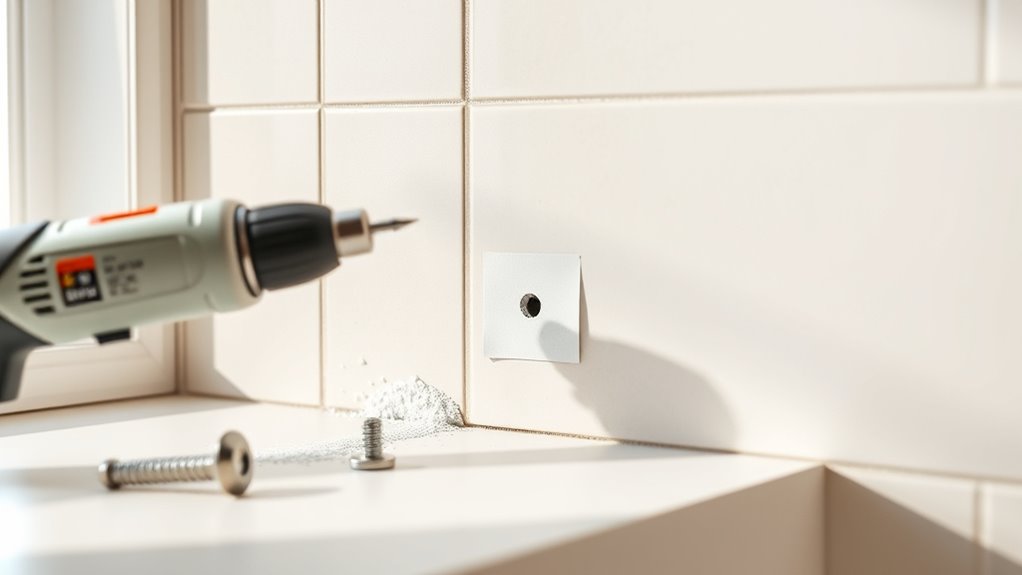
Why This Guide Answers “Can I Screw Into Tile?
Wondering whether you can screw into tile without cracking it? You’ll get practical steps, material checks, and safety tips so you can decide when to drill.
This guide explains how tile manufacturing affects strength, which screws and anchors suit different glazes, and how methodical prep—like mock tests and careful drilling—mirrors precise cooking techniques: patience, correct tools, and controlled heat (speed/pressure) for consistent results.
Quick Answer: When It’s Safe to Screw Into Tile
You can usually screw into ceramic tile if you use the right drill bit and anchors designed for softer tiles.
Porcelain is harder and may crack unless you predrill with a carbide or diamond bit and take it slow.
Also check that the adhesive behind the tile is solid—if it’s loose, anchors won’t hold regardless of tile type.
When Tiles Are Ceramic
How can you tell if it’s safe to screw into ceramic tile? You’ll check tile patterns and grout colors for clues: glazed ceramic is usually softer and drillable, while dense, smooth tiles resist. Use a carbide-tipped bit, low speed, and tape to prevent slipping. Test a hidden spot first.
| Feature | What to check |
|---|---|
| Surface | Glaze sheen |
| Edge | Thickness |
| Grout | Color/age |
| Test spot | Drill small pilot |
When Tiles Are Porcelain
If ceramic tiles can often be drilled with care, porcelain demands more caution because it’s denser and less forgiving.
You should use a sharp diamond or carbide bit, low speed, and water cooling to prevent cracking.
Test on a scrap tile matching your color options and tile patterns before committing.
Anchor into grout or substrate when possible, and avoid excessive force to reduce breakage.
When Adhesive Holds
When does it make sense to screw into tile instead of relying on adhesive alone? You can trust adhesive when the manufacturer rates it for the desired load, the tile design spreads stress evenly, and the substrate is solid.
Check grout color and joint integrity—cracked or soft grout signals weak adhesion. For heavy fixtures, mechanical fastening or anchors are safer than adhesive-only solutions.
How to Use This Guide: Quick Answers, Step‑By‑Step, and Troubleshooting
Use the quick answer summary to check at a glance whether it’s safe to screw into your tile. Then follow the step‑by‑step section for proper tools and techniques so you don’t crack or loosen tiles.
If something goes wrong, the troubleshooting tips will help you diagnose the issue and fix it.
Quick Answer Summary
Wondering whether you can screw into tile? This quick answer summary tells you when it’s safe, what anchors work, and how tile patterns and grout color affect visibility of patches.
Use the guide for fast decisions, then follow the step‑by‑step when needed. If a problem appears, consult the troubleshooting section—don’t improvise on fragile or glazed surfaces.
Step‑By‑Step Troubleshooting
You’ve got the quick answers — now let’s walk through how to handle common problems step by step.
If a screw cracks tile, stop, remove hardware, and patch with epoxy—match color options before curing.
For loose anchors, re-drill into a stud or use a toggle.
After work, perform tile cleaning to remove residue and inspect for hairline damage; retouch grout as needed.
Types of Tile: Ceramic, Porcelain, and Natural Stone
Although tile materials can look similar at a glance, the differences between ceramic, porcelain, and natural stone affect how you can drill, anchor, and fasten into them.
You’ll note ceramic’s glaze and artistic patterns, porcelain’s density and durability, and stone’s variability tied to historical context.
Each demands specific drill bits, slower drilling, and appropriate anchors to prevent cracks and secure fixtures.
How Tile Thickness Affects Screw Mounting
Tile thickness plays a big role in how securely you can mount screws: thin tiles can crack or split under concentrated pressure, while thicker tiles give more material for threads or anchors to bite into.
You’ll choose fasteners and drilling speed based on thickness to protect tile aesthetics and avoid chips. Proper technique also reduces grout cleaning from debris and prevents damage.
How Tile Backing and Substrate Change Your Approach
Because what’s behind the tile matters just as much as the visible surface, you’ll change your fastening method based on the backing and substrate: thin-set over cement board, mastic over drywall, or adhesive-mounted stone all behave differently under screws and anchors.
Because what’s behind the tile matters, adapt your fasteners to cement board, drywall, or adhesive-mounted stone.
Consider these specifics:
- Cement board: use anchors into substrate, protect tile art.
- Drywall+mastic: prefer toggle bolts behind tile.
- Stone: adhesive may hide fasteners; plan grout cleaning access.
When to Avoid Screwing Into Tile
If your tile is old, cracked, or especially thin, you shouldn’t risk drilling into it because it’ll likely chip or break.
You should also avoid screwing into tile in constantly wet areas like shower walls, where moisture can undermine anchors and cause leaks.
And don’t drill where plumbing or wiring runs behind the wall—hit a pipe or cable and you’ll have a much bigger problem.
Fragile Or Old Tile
When should you avoid screwing into tile? If tiles are old, cracked, or part of delicate tile patterns or have brittle grout colors, don’t force anchors. Consider these signs:
- Visible hairline cracks or loose tiles.
- Flaking glaze, soft backing, or powdery surface.
- Thin-set failure, large grout gaps, or prior repair patches.
Choose alternate mounting or consult a pro to prevent damage.
High-Moisture Areas
How often does moisture make tile a poor choice for screwing into? In high-moisture areas you’ll avoid screwing where constant dampness weakens adhesive and promotes mold.
Check tile patterns for hidden seams and choose spots with intact sealant. Mismatched grout color or deteriorated grout signals vulnerability.
If seals are compromised, don’t risk screws—repair or reroute mounting to dry, protected surfaces instead.
Behind Plumbing Or Wiring
Because tiles often hide a tangle of pipes and wires just behind the surface, you should never drill or drive screws without confirming what’s behind the tile.
You risk leaks, shocks, ruined decorative patterns, and mismatched repairs that hurt color matching.
Check studs, use a detector, or consult a pro:
- Scan for pipes/wires
- Use anchors only when safe
- Call a licensed plumber/electrician
Tools You Must Have Before Drilling Tile
Before you put a drill to tile, gather the right tools so you’ll work safely and get a clean hole the first time. You’ll need a tape measure, marker, masking tape, level, safety glasses, dust mask, and a drill with variable speed.
Inspect tile patterns and grout colors to plan placement and avoid visible mistakes; keep a vacuum handy for cleanup.
Best Drill Bits for Tile: Carbide, Diamond, and Masonry
Now that you’ve gathered the right tools and planned your layout, pick the proper drill bit for the tile material and the job. Choose based on tile patterns and grout colors to avoid visible mistakes.
- Carbide — good for glazed ceramic; economical.
- Diamond — best for porcelain and hard stone; precise.
- Masonry — works on softer tiles and backerboard; versatile.
How to Choose Anchors for Tile Installations
How do you pick anchors that won’t crack the tile or pull loose after installation? Choose anchors rated for the tile substrate—masonry anchors for cement backer, plastic or toggle anchors for drywall behind tile.
Match anchor size to screw and fixture load. Consider tile patterns and grout colors when placing anchors to minimize visual impact; hide anchors in grout lines when possible for a cleaner finish.
When to Use Screws Alone vs. Screws With Anchors
You can usually screw directly into solid backing like wood or a blocked stud without anchors, since the screw will bite and hold securely.
If the tile covers hollow cavities, drywall, or weak substrate, you’ll need anchors to spread the load and prevent pullout.
Next, we’ll look at examples and fastener types so you can pick the right approach for your wall.
When Screws Alone Work
Although tile often looks solid, you can sometimes screw directly into it without anchors—typically when the tile is ceramic or porcelain of standard thickness and you’re fastening something light, like a towel bar, small shelf bracket, or picture hook.
Consider these factors before proceeding:
- Tile patterns and grout colors won’t affect hold but guide drill placement.
- Use a carbide bit and steady pressure.
- Test on a scrap or hidden area first.
When Anchors Are Needed
When should you skip anchors and when should you rely on them? Use screws alone for light fixtures or trims when tile pattern aligns with studs and grout color matches repair.
Rely on anchors for heavy loads, hollow walls, or when studs don’t align—choose anchors rated for tile and load.
Match anchor placement to grout lines when possible to reduce cracking and improve hold.
How to Locate Studs Behind Tile
If you need to hang something heavy on tiled walls, locating the studs first will give you the strongest, safest anchor points. Inspect tile patterns and grout colors for seams or imperfections.
Use tools and steps:
- Run a stud finder slowly across tiles.
- Tap to listen for solid versus hollow sounds.
- Drill a small pilot hole through grout, not tile, to verify.
Why Hitting a Stud Is the Strongest Option
Because studs are solid wood or metal framed right behind the drywall and tile, hitting one gives you the most secure place to anchor heavy items like cabinets, towel bars, or mirrors. You’ll rely on the stud’s density rather than adhesive or anchors alone.
Consider tile patterns and grout colors when planning placement so mounts align visually, avoiding unnecessary stress on fragile tile edges.
How to Mark Drill Points Without Scratching Tile
Place a strip of painter’s tape over the tile where you need to mark to protect the glaze. Use a soft-tip marker on the tape as a guide so you can see and adjust the point without scratching the surface.
Peel the tape off and drill through it for a clean, precise start.
Use Painter’s Tape
Want a simple way to mark drill points without scratching your tile? Use painter’s tape to protect surfaces and keep marks visible against tile patterns and grout color. Apply tape, press flat, and mark through the tape.
Then:
- Center tape over your point.
- Use a sharp awl or nail to indent.
- Drill gently through the tape to start.
Soft-Tip Marker Guide
When you need a clean, scratch-free way to mark drill points on tile, a soft-tip marker gives you a visible dot without marring the surface.
You’ll choose marker shades that contrast with color patterns and grout colors so marks stand out.
Test on an inconspicuous tile first, press lightly, and wipe immediately with a damp cloth to avoid residue.
Drilling Glazed Ceramic Tile: Step‑By‑Step
If you’re drilling glazed ceramic tile, start by marking the spot and protecting the surface so the bit won’t wander or crack the glaze. Work slowly, match holes to tile patterns and grout colors, and keep cooling water nearby.
- Score with a carbide or diamond tip.
- Drill at low speed, light pressure.
- Clean debris and inspect edges before screwing.
Drilling Porcelain Tile Safely: Bits, Speed, and Technique
Porcelain needs different care than ceramic, so you’ll want the right bit, speed, and cutting technique to avoid cracks.
Use a carbide-tipped or diamond bit, run the drill at a low to moderate speed, and start with a shallow pilot point before increasing pressure.
Follow a steady, light feed and keep the bit cool to get clean holes without damage.
Choosing The Right Bit
Choosing the right drill bit makes the difference between a clean hole and a cracked tile, so pick one designed for hard, brittle surfaces like porcelain. You’ll want bits that match tile patterns and grout colors planning so holes blend.
Consider:
- Diamond-tipped for porcelain.
- Carbide for glazed ceramic.
- Masonry for backer board—use guides and steady pressure.
Optimal Drill Speed
How fast should you spin the drill when working with porcelain tile? You’ll use low RPMs—typically 300–800—keeping steady pressure and pauses to avoid overheating.
Match speed to your diamond or carbide bit and watch tile patterns to prevent chipping at edges. Slow, controlled drilling also protects grout color from heat stains.
Cool with water and check progress frequently.
Technique For Clean Cuts
When you need a clean hole in hard tile, work slowly and methodically: steady pressure, consistent low RPMs, and a water trickle will keep the bit cool and the cut crisp. Use a diamond bit, start with a pilot mark, and avoid chipping. Maintain edges for Tile cleaning and grout sealing.
- Mark precisely
- Cool continuously
- Finish gently
Drilling Natural Stone Tile: Step‑By‑Step
Before you drill, make sure you’ve marked the spot, secured the tile, and picked the right bit so you don’t crack the stone.
Use masking tape over marks, align with tile patterns to avoid awkward cuts, and note grout colors to blend holes.
Start with a pilot dimple, keep drill perpendicular, cool the bit with water, then enlarge slowly to final diameter.
How to Control Drill Speed and Pressure to Prevent Cracks
Start your hole with a low drill speed so the bit finds its mark without slipping.
Apply moderate, steady pressure—don’t force the bit, let it cut at its own pace.
Use short pulses and take breaks to prevent heat buildup and reduce the chance of cracking.
Start Slow And Steady
Wondering how to keep your drill from cracking tile? You start slow and steady, matching speed to tile patterns and watching grout color edges for stress. Use controlled pressure, pause often, and let the bit do work.
- Begin at low RPMs.
- Increase gradually.
- Stop if hairline cracks appear.
Moderate Pressure, Not Force
When you drill into tile, apply steady, moderate pressure—don’t force the bit—and let the drill’s speed and the bit’s design do the cutting.
Keep the tip perpendicular to avoid slipping across tile patterns and stressing edges.
Maintain consistent pressure to protect grout health and prevent cracks.
If resistance rises, ease off, reposition, and verify your bit is sharp and appropriate for the tile.
Use Pulse And Breaks
You can further protect tile by pulsing the drill—short, controlled bursts instead of a continuous push—so heat and vibration don’t build up and crack the glaze.
Adjust speed and pressure based on tile patterns and grout types.
Try this routine:
- Low RPM, light downward force.
- 1–2 second pulses, release.
- Cool bit, clear debris, reassess.
How to Use Masking Tape and Templates for Clean Holes
Although tile’s glazed surface can make drill bits wander, masking tape and a simple template give you the control to start clean, accurate holes.
Apply tape over your mark, align a paper or cardboard template to match tile patterns and grout colors, then mark through the template.
Tape the template down firmly to prevent slipping, and drill slowly using the taped guide for steady, precise starts.
How to Start Holes Without a Center Punch (Alternatives)
If you don’t have a center punch, several simple alternatives will keep a drill bit from wandering: press a short, sharp indentation with a nail or awl, stick a drop of hot glue or superglue at the mark, or use a self-centering drill bit or screw to create a small starting groove—each option gives a positive bite for the bit so you can drill straight through tile without slipping.
- Nail or awl indentation
- Glue dab starter
- Self-centering bit
Consider decorative patterns and grout color when planning hole placement so repairs or touch-ups blend seamlessly.
How to Cool the Drill Bit and Tile While Cutting
When drilling tile you’ll need to keep both the bit and the surrounding glaze cool to prevent cracking and dulling; drip water steadily, pause frequently, and use a diamond bit at low speed. Match cooling placement to tile patterns and grout color to avoid staining.
| Water drip | Slow speed |
|---|---|
| Short pauses | Diamond bit |
| Cool glaze | Avoid stains |
Drilling Large Holes for Pipes and Fixtures
To drill large holes for pipes and fixtures, start by marking the exact center and checking behind the tile for wiring or studs. You’ll need a hole saw or carbide-tipped bit sized to the pipe’s outer diameter and a steady, low RPM on your drill.
Follow steps:
- Protect surrounding tile patterns and edges with tape.
- Cool and clear debris frequently.
- Finish with careful grout maintenance and sealant.
How to Install Sleeve Anchors in Tile and Substrate
When you’re fastening into tile and the substrate beneath, start by picking a sleeve anchor sized for the tile thickness and load it’ll bear.
Use a masonry bit at the correct drill speed, keep the hole clean, and match the depth to the anchor’s specifications.
Tap the sleeve in, tighten the bolt until the sleeve expands in the substrate, and check that the fixture sits flush and secure.
Choosing The Right Anchor
Which anchor works best depends on the tile, the substrate beneath it, and the load you’re hanging. You’ll match anchors to tile patterns and grout color to minimize visibility and choose materials for moisture. Consider:
- Light loads: plastic anchors in grout lines.
- Medium loads: sleeve anchors into substrate behind tile.
- Heavy loads: stainless steel through-bolt with proper backing support.
Proper Drilling Technique
Before you drill, mark the hole precisely and double-check what’s behind the tile so you don’t hit pipes or wiring.
Use a carbide masonry bit at low speed with light pressure; pause to clear dust and avoid overheating the tile.
Protect edges with masking tape, maintain steady perpendicular alignment, and consider tile sealing after drilling.
Clean grout lines afterward to remove debris before installing anchors.
Installing And Securing Sleeve
After drilling and clearing the hole, you’ll set the sleeve anchor so its sleeve sits flush against the tile surface and the anchor’s threaded rod extends into the substrate.
Tighten gradually while watching for tile movement, especially around tile patterns or decorative accents.
- Insert anchor fully.
- Expand sleeve with measured torque.
- Recheck alignment and finish trim.
How to Use Toggle Bolts Behind Tile Safely
When you’re mounting heavy items on tile, toggle bolts give you secure anchoring behind the wall rather than relying on tile or thin adhesive alone.
Mark drill points considering tile patterns and grout color to avoid cracks.
Use a carbide bit, drill slowly, insert toggle folded, tighten gently until snug.
Avoid overtightening, check for solid backing, and seal edges to prevent moisture.
When to Choose Chemical (Epoxy) Anchors for Tile
If you need to support heavy loads or you’re dealing with hollow tile where mechanical anchors won’t bite, you’ll want to think about chemical (epoxy) anchors.
They’ll fill voids and create a strong bond even in hollow or thin-tile situations, but you should check that the epoxy is compatible with the tile material and any surrounding sealants.
I’ll cover how to choose the right resin, curing times, and surface prep next.
High-Load Applications
For heavy fixtures—like grab bars, wall-mounted cabinets, or railings—you’ll want anchors that bond into the substrate rather than just gripping the tile. Consider epoxy anchors when tile patterns or grout color limit mechanical options.
Use epoxy for:
- Load-bearing bathroom safety bars.
- Kitchen cabinets on tiled backsplashes.
- Handrails or shelving where vibration occurs.
Epoxy transfers load into solid material, not brittle glaze.
Hollow Tile Situations
Heavy fixtures that rely on substrate bonding call attention to a different challenge: hollow or voided tile. When you encounter voids, you’ll often avoid mechanical anchors and choose chemical (epoxy) anchors that bridge gaps and bond directly to tile and substrate.
Epoxy works well around delicate Tile art and won’t disturb decorative grout if you inject carefully and clean excess before curing.
Chemical Compatibility Considerations
When should you reach for a chemical (epoxy) anchor instead of a mechanical one? You’ll choose epoxy when tile is thin, hollow, or cracked and mechanical anchors risk damage. Consider:
- Bonding strength needed for heavy fixtures.
- Chemical compatibility with tile cleaning agents and grout sealing products.
- Long-term moisture exposure that weakens mechanical fixes.
Epoxy gives reliable adhesion without expanding stress.
How to Select Screw Length and Diameter for Tile Mounts
Because tile only hides the real support behind it, you need to match screw length and diameter to the thickness of the tile, the substrate, and the load you expect.
Check tile patterns and grout colors only for aesthetic placement.
Measure tile plus substrate depth, choose screws long enough to engage backing (but not penetrate utilities), and pick diameter for anchor type and expected shear/tension.
How to Distribute Weight for Heavy Wall‑Mounted Items
For heavy wall-mounted items, you should spread the load across multiple studs to prevent any single fastener from bearing too much weight.
If studs aren’t available where you need them, use heavy-duty anchors rated for the specific load and tile type.
Always check anchor weight ratings and fastener placement before mounting.
Spread Load Across Studs
If you’re hanging something heavy on tile, don’t concentrate the weight on a single stud—spread the load across multiple studs to reduce stress on the tile and framing. You’ll protect tile aesthetics and avoid grout color cracks by distributing forces.
Use a rail or mounting plate and:
- Align mounts with adjacent studs.
- Measure spacing precisely.
- Balance load symmetrically.
Use Heavy‑Duty Anchors
When you’re mounting something heavy on tile, use heavy-duty anchors designed to carry significant loads and resist vibration. They’ll let you secure the fixture when you can’t hit a stud or when studs don’t align with your mounting points.
Choose anchors rated for the load, install per instructions, and stagger attachments to spread weight.
Match placements to tile patterns and grout colors to minimize visual impact.
Maximum Safe Loads for Common Anchors in Tile
How much weight can you safely hang from tile without risking cracks or anchor failure? You’ll consider tile patterns and grout colors for placement; denser substrates give higher capacity.
Typical safe loads (approximate):
Typical safe loads (approximate): plastic anchors 10–25 lb, toggles 50–100 lb, sleeve anchors 75–150 lb—confirm specs.
- Plastic anchors: 10–25 lb in tile only.
- Toggle bolts: 50–100 lb into hollow spaces.
- Sleeve/hammer anchors: 75–150 lb in solid substrate.
Always confirm with manufacturer specs and substrate condition.
How to Install Towel Bars and Prevent Pullouts
Because towel bars get frequent, angled pulls, you need a secure method that anchors into solid substrate or uses robust anchors rated for tile.
Choose anchor locations that align with studs or use sleeve/molly anchors sized for tile and backer.
Match tile patterns and grout colors when marking and sealing holes.
Tighten mounts evenly, use silicone sealant, and test pull strength before regular use.
How to Mount Shelves on Tiled Walls Securely
When you’re mounting shelves on tile, pick a carbide or diamond-tipped drill bit made for tile so you can bore cleanly without cracking.
Use the right tile anchors or sleeve anchors sized for the shelf load to keep the fasteners secure.
Protect tile edges with masking tape and a slow, steady drilling speed to avoid chips and fractures.
Choose Proper Drill Bits
Wondering which drill bits will get you through tile without cracking it? Use carbide-tipped or diamond bits for porcelain, ceramic, and glass tiles. Start slow to avoid tile staining or grout sealing damage. Choose bits by tile hardness and thickness.
- Carbide-tipped — ceramic, budget-friendly.
- Diamond-tipped — porcelain, strongest.
- Glass-specific — for glossy or subway tiles.
Use Tile Anchors
How do you make certain a shelf stays put on tile without cracking or pulling out? Use anchors sized for tile thickness and weight, marking holes to avoid awkward tile pattern crossings.
Drill slowly, insert plastic or metal anchors flush with the surface, then screw in hardware.
Match anchor placement to grout color lines when possible to minimize visibility and ensure strong support.
Protect Tile Edges
Because tile edges chip easily under pressure, you’ll want to protect them before mounting shelves so the tiles and grout stay intact. Use soft-edge brackets or rubber grommets, and plan color coordination so mounts blend with tiles. Also prioritize grout sealing around holes.
- Pad brackets with rubber or felt.
- Pre-drill through spacer, not tile edge.
- Seal after install.
How to Hang Mirrors and Heavy Decor on Tile
Need a heavy mirror or art to hang on tile? Match tile patterns and grout colors when planning placement to minimize visible damage.
Use a stud or proper anchor rated for the load; drill through tile with a carbide or diamond bit, steady and slow.
Seal holes with silicone to prevent moisture.
Hang with hardware designed for mirrors, checking level and secure fastening before release.
How to Mount Bathroom Hardware Without Removing Tiles
Start by positioning and marking your hardware carefully so your holes or adhesive spots line up perfectly with studs or grout lines.
For lightweight items, you can use strong tile-friendly adhesives or silicone.
For heavier pieces, pick the right anchors rated for tile and the weight.
I’ll cover how to prep the tile surface, drill safely if needed, and choose anchors or adhesives that hold.
Positioning And Marking
When you’re mounting towel bars, grab handles, or shelves on tiled walls, take time to position and mark carefully so your anchors line up with studs or fall symmetrically between grout lines. Consider tile patterns and grout color to hide marks.
Use a level and pencil, then:
- Measure stud spacing.
- Align with tile seams.
- Mark mounting holes precisely.
Anchors And Adhesives
With your marks in place, pick anchors and adhesives that match the tile type and the load they’ll carry—plastic expansion anchors and toggle bolts work for hollow walls, while masonry anchors suit ceramic or porcelain over solid backing. You’ll consider tile patterns and grout colors when concealing heads; use silicone or epoxy for non-drilled mounts and choose anchor lengths to reach backing, not just grout.
| Anchor | Best for |
|---|---|
| Toggle bolt | Hollow wall |
| Masonry anchor | Solid tile |
How to Avoid Tile Cracks When Tightening Screws
If you tighten screws too quickly or directly into tile without prep, the vibration and pressure can cause hairline cracks or visible breakage. So take steps to reduce stress on the ceramic.
Prioritize tile cleaning and grout sealing beforehand. Follow these actions:
Prioritize cleaning and sealing grout first—then follow careful installation steps to protect your tile from cracks.
- Use a soft spacer or washer to spread load.
- Pre-drill with a tile bit at low speed.
- Tighten slowly, stopping frequently to check.
How to Repair Cracked Tile After a Drilling Mishap
Because accidents happen while you’re drilling, you can still fix a cracked tile without replacing the whole wall or floor.
First, clean the crack, loosen fragments, and use an epoxy filler matched to tile color. Smooth and let cure, then carefully sand.
Finish by blending surrounding grout types to mask edges.
For deeper damage, consider a professional patch to avoid further cracking.
How to Patch a Hole in Tile and Regrout
When a drill or an accident leaves a hole in a tile, you can repair it and regrout the area without replacing the whole piece by following a few careful steps.
Clean, fill with epoxy or tile repair compound, sand smooth, then match finish and grout.
Consider tile patterns and grout colors to blend.
- Prep
- Fill
- Regrout
When to Replace a Tile Instead of Repairing It
Although small chips and surface scratches can be filled and regrouted, you should replace a tile when damage compromises its structure, appearance, or the waterproofing behind it.
If cracks run through the body, if replacement better matches tile color and grout color, or if repeated repairs fail, swap the tile. Don’t risk hidden breakage or uneven surfaces—replace promptly for durability and aesthetics.
Waterproof Membranes Behind Tile: Drilling and Anchor Concerns
Replacing a badly damaged tile often means exposing whatever’s behind it, and that’s where waterproof membranes come into play — you need to know how drilling or anchoring can affect them.
You’ll avoid leaks by protecting membranes when fastening anchors; consider Tile patterns and grout color when planning repairs.
- Test membrane thickness.
- Use sealed anchors.
- Reseat tiles carefully.
Electrical and Plumbing Considerations When Drilling Tile
How close are electrical wires and plumbing pipes to the tile you’re about to drill? Check behind tiles for wiring routes and water lines, using stud finders or openings.
Match drill locations to tile patterns and grout colors to minimize visible fixes. Turn power and water off before penetrating walls, and consult plans or a pro if routing is unclear to avoid costly damage.
Safety Precautions: Eye Protection, Respirators, and Gloves
Before you drill into tile, protect your eyes, lungs, and hands—safety gear prevents tiny shards, silica dust, and sharp edges from causing lasting harm.
You should respect historical context and cultural significance of materials while working.
Use these essentials:
- Safety goggles (impact-rated)
- N95 or P100 respirator
- Cut-resistant gloves
Wear gear, check fit, and replace damaged items promptly.
How to Minimize Dust and Clean Up After Drilling Tile
With your protective gear on, take steps to keep dust contained and make cleanup quick. Tape plastic sheeting around the work area, cover nearby fixtures to protect tile patterns and grout colors, and score edges so dust drops into a tub.
Drill slowly with a vacuum hose near the bit, wipe residue with a damp microfiber, and dispose of slurry promptly to avoid staining.
Top Mistakes That Crack Tile or Cause Failures
One common mistake that leads to cracked tile is forcing a drill too quickly—if you push hard, use the wrong bit, or spin at high speed you’ll chip the glaze or fracture the body.
You should also avoid undermining support, mismatching Tile design with fastener placement, or neglecting grout colors that mask stress lines.
- Wrong bit
- Excess force
- Poor placement
Pro Tips From Tilers and Contractors
After seeing how easily tiles crack from the wrong bit, too much force, or poor placement, listen to what pros do differently: they pick the right anchor and bit for the tile type, control drill speed and pressure, and plan fastener locations to keep weight on the substrate rather than the glaze.
You’ll respect tile artistry, score lightly, use masking tape, dry-fit anchors, and preserve grout sealing to prevent moisture and movement.
Cost Comparison: Anchors, Bits, and Professional Help
Picking the right anchors and bits can save you money and headaches, so weigh the cost of materials against the value of a pro’s time. You’ll consider tile grout repair and preserving surface finish.
Calculate expenses:
- Anchors: $5–$20 for quality sets.
- Carbide/diamond bits: $10–$60.
- Pro labor: hourly rates vary; factor travel and risk.
When to Call a Pro vs. DIY for Tile Mounting
If you’ve never drilled tile before or the fixture is heavy or valuable, call a pro—risks like cracked tile, water leaks behind walls, or poorly anchored loads aren’t worth learning on an important installation.
For simple hooks or light shelves you can DIY, but consider tile aesthetics and grout maintenance.
Hire help for structural anchors, wet areas, or when precision matters for long-term durability.
Product Checklist: Bits, Anchors, and Screws to Buy
Before you start drilling or decide to call a pro, gather the right bits, anchors, and screws so the work goes smoothly and the tile stays intact. Pick carbide or diamond bits, plastic or metal anchors rated for tile, and corrosion‑resistant screws sized to the fixture.
Consider weight: garden furniture mounts differ from light kitchen appliances.
- Bits
- Anchors
- Screws
Quick Troubleshooting: No Hold, Slipping, or Cracking
When a screw won’t bite, the anchor slips, or a tile cracks, act fast to minimize damage and diagnose the cause. Stop, remove load, and inspect anchor type and drill hole size.
Check tile color and pattern — hairline cracks hide better in darker tiles.
Assess grout maintenance; loose grout can mean hollow spots.
Replace anchors, fill cracks, and retest carefully.
How to Test the Strength of Your Mounted Item
Because the point of mounting is support, you should test the strength of your install methodically and safely.
Check tile patterns and grout color alignment so loads sit on solid substrate, not just decoration.
Perform staged load tests:
- Apply light hand pressure, watch for movement.
- Increase to expected load, monitor anchors.
- Use a safety catch and test beyond expected weight briefly.
Maintenance Tips to Keep Mounts Secure Over Time
If you want your mounts to stay secure, check them periodically for looseness, corrosion, and grout or tile cracks so you can fix issues before they worsen.
Inspect fasteners, seals, and surrounding tile design for stress patterns.
Tighten anchors, replace corroded screws, and perform regular grout maintenance to prevent water intrusion.
Note movement early and repair promptly to avoid bigger problems.
Further Resources and Standards for Tile Fastening
As you plan tile fastenings, consult authoritative resources and industry standards to guarantee safety and longevity. You’ll learn how mounting choices interact with tile patterns and grout color, and how substrate and load ratings matter.
Follow guidelines:
- Manufacturer installation manuals.
- Local building codes and seismic requirements.
- Tile industry standards (e.g., ANSI, ISO) for anchors and adhesives.
Frequently Asked Questions
Can I Use Self-Tapping Screws Directly Into Unbacked Tile?
No — you shouldn’t use self-tapping screws directly into unbacked tile. You’ll need proper tile drilling, use suitable screw types with anchors or backer support, and pilot holes to avoid cracking and guarantee secure, lasting mounts.
Will Driven Screws Cause Microfractures That Show Later?
Yes — driven screws can cause microfractures that show later. When you rely on careful tile drilling and proper anchors, screws durability improves, but careless driving or skipping pilot holes raises fracture risk and shortens long-term holding strength.
Can Tile Adhesive Bonds Be Used to Secure Light Fixtures?
Yes — but don’t be surprised if you’re tempted to skip proper anchoring: adhesive strength alone rarely suffices for light fixtures. Rely on certified adhesives plus mechanical support, and plan for safe tile removal if future changes arise.
Are There Tile-Safe Screw Coatings to Prevent Corrosion?
Yes — you can use stainless-steel or zinc-plated screws and specialty ceramic-coated fasteners to prevent corrosion. You’ll protect tile maintenance and guarantee screw compatibility, using appropriate anchors and sealants for long-lasting, tile-friendly attachments.
How Do Temperature Changes Affect Screw Holds in Tile?
About 60% of failures start from thermal cycling: you’ll notice thermal expansion stresses loosen anchors and drive microcracks, accelerating crack propagation; so you’ll need flexible anchors, periodic checks, and allow movement to maintain screw holds.
Conclusion
You can screw into tile when you choose the right anchors, drill bits, and technique — but you’ll want to be careful so you don’t crack the tile or lose holding power. Match fasteners to tile type and thickness, drill slowly with a carbide or diamond bit, and use anchors sized for the substrate behind the tile. Test weight capacity before fully committing, and check mounts periodically so they stay secure — better safe than sorry.
