Are All Glasses Screws the Same Size
No — they’re not all the same. You’ll find many diameters, lengths, thread pitches and head styles depending on frame brand, hinge type and rim design, and tiny rimless screws differ from standard hinge screws. Materials and finishes vary too, affecting fit and corrosion resistance. Always measure diameter, length and thread pitch or match the manufacturer part before replacement to avoid stripped threads or wobble. Keep going to learn how to identify and source the right one.
How This Guide Helps You Replace and Size Glasses Screws
When you need to replace a glasses screw, this guide shows you how to identify the size, choose the right replacement, and install it correctly so your frames stay secure.
You’ll learn quick sizing checks, matching materials, and where fashion trends and color options matter for visible frames.
Follow compact steps, use basic tools, and keep spare screws for fast, reliable repairs.
Quick Answer: Are All Glasses Screws the Same Size?
Although some screws look similar, glasses screws come in several sizes and types, so you can’t assume they’re interchangeable. You’ll find tiny differences by frame brand, hinge design, or lens rim.
Check measurements before replacing, since fashion trends and sunglass styles can change hardware choices.
Keep a small kit with common sizes, or note part numbers to get the right screw quickly.
Why Screw Size Matters for Frame Durability
Because the screw holds moving parts and alignment, choosing the right size directly affects your frame’s strength and longevity. You’ll extend wear, protect lens coating, and keep frame color intact by matching diameter and length to the hinge.
Consider impacts like:
- Reduced wobble
- Even stress distribution
- Fewer repairs
- Lower lens chipping risk
- Consistent temple tension
Glasses Screw Anatomy: Head, Shank, Thread, Tip
Curious how a tiny screw keeps your frames aligned? You’ll spot four parts: the head (driven by a tool), the shank (length fitting hinge depth), the threaded section (grips into frame materials), and the tip (guides insertion).
Choose screws that won’t abrade lens coatings or clash with metals or plastics.
Correct anatomy prevents stripping, loosening, and stress on frames.
Common Screw Head Types (Phillips, Flat, Hex, Tri‑Wing)
Now that you know the four parts of a glasses screw, look at the head next — it determines what driver you’ll use and how securely the screw sits.
You’ll choose heads considering lens coatings and frame materials to avoid damage.
Common heads include:
- Phillips: cross, common
- Flat: single slot
- Hex: Allen, tight fit
- Tri‑wing: tamper‑resistant
- Torx: star drive
Typical Thread Types and Pitches for Eyeglass Screws
When you look closely at eyeglass screws, you’ll see they use a few consistent thread forms and very fine pitches to suit the thin metal and plastic parts they join.
You’ll find unified threads like ISO metric micro and proprietary coarse variants, chosen to match frame material and prevent stripping.
Color options affect coatings only; thread spec and pitch guarantee secure, low-profile joins.
Common Screw Lengths Used in Frames
Eyeglass frames typically use very short screws—often just 1.0 to 3.0 millimeters long—because they only need to pass through thin lens rims, temples, or hinge plates.
You’ll find exact lengths chosen to match the stacked thickness of the parts being joined and to leave enough thread engagement without poking through.
- Nosepad arm screws
- Rim-to-hinge screws
- Temple pivot screws
- Lens-retaining screws
- Decorative cap screws
You’ll check lengths during lens cleaning and after frame polishing to guarantee secure fit.
Materials and Finishes That Affect Fit and Corrosion
Short screws and exact lengths only solve part of the fit problem—you also need to take into account what those screws are made of and how they’re finished, because material and plating affect both mechanical fit and corrosion resistance. You should check material compatibility and finishing options to prevent galling and rust; choose stainless, titanium, or plated brass for strength and longevity.
| Material | Corrosion | Fit |
|---|---|---|
| Stainless | High | Tight |
| Titanium | Very High | Precise |
| Brass (plated) | Moderate | Adjustable |
How Frame Design Affects Screw Type and Size
Your frame’s rim type — full, semi-rim, or rimless — changes the screws you need, since some mount into thicker material while others bite into tiny posts.
The hinge design also matters: barrel hinges, spring hinges, and integrated hinges each call for different lengths and head styles.
Finally, the lens mounting method (screws vs. beads vs. grooves) dictates thread size and strength, so you’ll want to match screw specs to the construction.
Rim Type Variation
How does the frame’s rim style change which screw you need? You’ll match screws to lens coatings and frame materials; rim depth and edge type dictate length and head style.
- Full-rim: standard length, thicker shaft
- Semi-rim: shorter, specialized heads
- Rimless: very short, precision thread
- Nylon-strung: tiny anchor screws
- Wraparound: longer, corrosion-resistant options
Hinge Mechanism Differences
Because hinges take the stresses of opening, closing, and daily wear, they determine screw length, head type, and thread pitch more than most other frame features.
You’ll notice metal frames need coarser threads and longer screws; acetate or mixed frame materials often use shorter, finer screws.
Consider lens coatings when swapping hinges—abrasive cleaners can loosen screws—so match screw type to hinge style and material.
Lens Mounting Method
When frames secure lenses with full rims, semi-rims, drill mounts, or rimless fittings, they dictate the screw type, length, and head style you’ll need for reliable assembly.
You’ll choose screws by frame material, lens thickness, and lens coating to avoid stress or corrosion.
- Full rim: longer machine screws
- Semi-rim: short captive screws
- Drill mount: tiny thread-in screws
- Rimless: precision studs
- Plastic: self-tapping screws
Hinge Styles and the Screws They Require
Different hinge styles call for very different screw types and sizes, so you’ll want to identify the hinge before you start swapping or tightening screws.
Barrel, spring, and rivet hinges each need specific screw heads, lengths, and strengths.
Consider lens coating sensitivity and frame color finishes when choosing replacement screws to avoid corrosion or visible mismatches that ruin fit and appearance.
Rimless and Semi‑Rimless Lens‑Mount Screws
If you wear rimless or semi‑rimless glasses, the tiny lens‑mount screws are doing a lot of work for how small they are. You’ll notice variations in size and thread depending on frame design and fashion trends.
Keep them tight and clean during lens cleaning.
Typical considerations include:
- Screw head type
- Thread pitch
- Length
- Material
- Replacement availability
Nose‑Pad Screws vs Hinge Screws: What Differs
Although both are small and easy to overlook, nose‑pad screws and hinge screws serve very different jobs and have different specifications you should know about.
You’ll find nose‑pad screws are finer, shorter, and designed for soft contact with pad arms.
Hinge screws are thicker, handle mechanical stress, and match frame materials.
Consider lens coatings when replacing parts to avoid contamination or corrosion.
Temple‑to‑Hinge Screw Types and Spacers
When you look at temple‑to‑hinge fastenings, you’ll find different screw types—threaded, rivet‑style, and torque‑fit—that each fit specific hinge designs.
You’ll also need spacers made from metal, plastic, or nylon to align temples and avoid frame stress. Use the correct spacer thickness for your frame to keep the temple tension right and prevent rubbing or loosening.
Temple Screw Types
Temple screws connect the temple (arm) to the hinge and come in a few common styles—short pin screws, longer thread screws, and captive or security screws—each chosen for frame material, hinge design, and desired serviceability.
You’ll pick screws that match fashion trends and won’t complicate lens cleaning.
- Short pin: low profile
- Threaded: adjustable
- Captive: retained
- Security: tamper‑resistant
- Spacer: alignment aid
Spacer Materials Options
Why choose one spacer material over another? You’ll pick spacer materials based on durability, corrosion resistance, and flexibility.
Metal spacers offer strength; plastic reduces weight and can damp vibration.
Consider frame compatibility—metal frames tolerate metal spacers, while delicate acetate suits softer plastics or nylon.
Match material to frame design and wearing habits to maintain hinge alignment and long-term function.
Correct Spacer Thickness
If your frame and spacer material are matched correctly, the next step is getting spacer thickness right so the hinge operates smoothly and the temple sits flush. You’ll test fit, adjust, then finish with lens cleaning and frame polishing.
Consider:
- Measure gap precisely
- Use layered shims
- Avoid over-compression
- Check hinge play
- Recheck alignment before final polish
Micro Screws for Rimless Mounts: Special Cases
Because rimless frames rely on tiny hardware to hold lenses in place, micro screws become a critical—and often overlooked—consideration when you’re replacing or adjusting glasses.
You’ll need exact matches for thread, length, and head type to avoid stress on holes, damage during lens cleaning, or misalignment with decorative accents.
Keep spares and use proper tools to prevent stripping or loss.
Metric Sizing Basics for Eyeglass Screws (M0.6, M1.0)
When you talk about eyeglass screws, metric designations like M0.6 and M1.0 tell you the thread diameter in millimeters and set expectations for pitch and compatibility.
M0.6 is common for ultra-fine rimless and delicate hinges.
M1.0 suits sturdier temples and bridge assemblies.
- M0.6: ultra-fine, light frames
- M1.0: stronger, metal frames
Compatibility affects repair options.
Consider Frame materials for strength.
Lens tinting processes may prefer stable mounts.
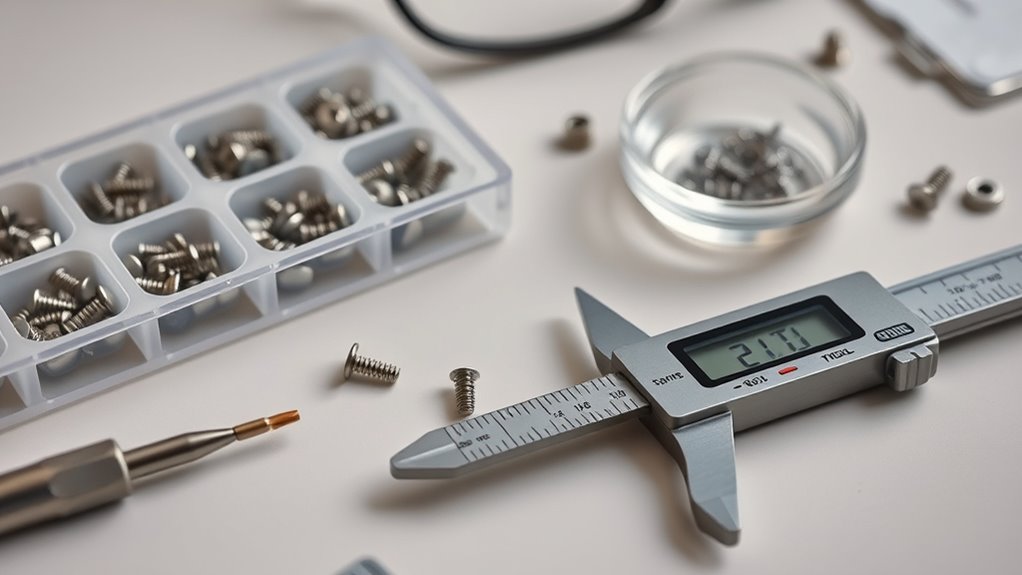
How to Measure Eyeglass Screws Accurately
Although eyeglass screws are tiny, you can measure them reliably with the right tools and technique. Hold the screw steady, measure thread diameter with a caliper to nearest 0.1 mm, and count threads per millimeter under magnification.
Note head diameter and length. Record measurements alongside frame model since fashion trends and prescription guidelines can affect screw choices, helping you match replacements precisely.
Tools for Identifying and Removing Tiny Screws
Having accurate measurements in hand makes picking the right tools much easier. You’ll want compact, precise gear that matches evolving fashion trends and helps with lens cleaning.
Consider these essentials:
- Precision jeweler’s screwdriver set
- Magnetic parts tray
- Loupe or magnifying glass
- Fine-tip tweezers
- Portable screw gauge
Use steady light, work on a soft mat, and keep parts organized.
Determining Thread Pitch Without Special Tools
If you don’t have a thread gauge, you can still estimate a screw’s pitch using simple, precise methods and a bit of patience.
Count threads across a measured length with a magnifier, compare to a known screw, and test fit carefully.
Note lens coatings and frame materials to avoid damage when probing threads, and record measurements for future replacements.
Identifying Screw Head Types by Sight
You can often tell a screw’s head type just by looking at its shape and markings. Check for simple slots or Phillips crosses.
And note tiny specialty heads like tri-wing or pentalobe that are common on miniature eyewear parts. Spotting these visual cues will help you pick the right driver without guessing.
Visual Head Shape Cues
When you look closely at a frame’s screw head, its silhouette often gives away the type—flat, pan, oval, or round—so you can quickly narrow down the screwdriver or bit you’ll need.
You’ll notice Fashion trends and Frame materials influence head choices. Visual cues include:
- Low-profile flat heads
- Rounded pan heads
- Elliptical oval heads
- Dome-like round heads
- Tiny countersunk variants
Slot And Cross Types
Because slot and cross screw heads look similar at a glance, learning a few quick visual checks lets you identify them reliably.
You’ll spot a single straight groove for slotted heads and a plus-shaped recess for Phillips.
Inspect wear pattern, lens coating residue, and how the screw sits against the frame material. That helps pick the right driver and avoid cam‑out or damage.
Miniature Specialty Heads
Although they’re tiny, miniature specialty heads demand a keen eye, since their shapes and drive patterns differ from common slotted or Phillips screws. You’ll spot them on a vintage frame or when matching lens materials; identify by profile, recess, and tool fit.
Look for:
- Tubular
- Tri-point
- Pentalobe
- Torx TR
- Hexalobular
When a Screw Looks Right but Won’t Seat Properly
If the screw looks like the right size but won’t seat properly, don’t assume it’s the wrong part—you might be missing a subtle mismatch in thread pitch, head profile, or lens pad geometry.
You should check mating threads, inspect head countersinks, and verify pad recess shape.
Small differences affect fit, fashion trends won’t change functional specs, and optical clarity demands precise seating to avoid stress and distortion.
Common Fit Problems: Stripped Threads and Loose Hinges
You’ll often run into two common fit problems: stripped screw threads and loose hinge connections.
If threads are stripped, the screw won’t catch and the joint will wobble even if the screw looks right.
Tightening a loose hinge or replacing damaged threads fixes most fit issues quickly.
Stripped Screw Threads
When screw threads strip, the hinge can wobble or the lens mount can fail, leaving your glasses loose or unusable. You’ll notice movement during lens cleaning or while frame polishing. Act quickly to avoid loss or damage.
- Screw spins with no bite
- Hinge tilts under pressure
- Lens shifts in its groove
- Screws back out repeatedly
- Metal threads look smooth
Loose Hinge Connections
Although stripped threads often grab the spotlight, loose hinge connections are an equally common problem that can make your glasses feel shaky or misaligned. You can tighten screws, check frame material for wear, or replace hinges to match lens shape and restore fit. Quick fixes avoid damage; professional repair guarantees lasting alignment.
| Symptom | Fix |
|---|---|
| Wobble | Tighten |
| Misalignment | Adjust |
| Wear | Replace |
| Loose screw | Secure |
Safe Temporary Fixes: Thread Tape, Epoxy, Substitutes
If a proper replacement screw isn’t immediately available, there are a few safe temporary fixes you can use to hold your glasses together until you get the right part.
You’ll balance repair with fashion trends and material sustainability. Try these quick options:
- Thread tape for loose threads
- Clear epoxy for central joints
- Nail polish as sealant
- Micro washer substitute
- Tiny zip tie adjustments
How to Remove a Stuck or Rusted Glasses Screw Safely
Because stuck or rusted screws can strip or snap quickly, you’ll want to approach removal with patience and the right tools—small precision screwdrivers, penetrating oil or alcohol, a rubber-grip pad, and good lighting.
Apply oil, let it soak, then turn gently; use a rubber pad for grip.
Protect frame color and any laser engraving by taping nearby surfaces before working.
Should You Use Threadlocker on Eyeglass Screws?
Wondering whether you should use threadlocker on eyeglass screws? You can, but choose low-strength formulas so you can adjust frames as fashion trends shift. Consider cleaning threads first and testing a tiny drop.
- Prevents loosening
- Allows future repairs
- Avoids gluing hinges
- Matches eyewear history of simple fixes
Use sparingly and precisely.
Replace the Screw or the Hinge: Cost vs Durability
When a loose hinge keeps flapping or a stripped thread won’t hold a screw, you’ll weigh replacing just the screw against swapping the whole hinge.
When a hinge flaps or a thread strips, decide: replace the screw for thrift, swap the hinge for lasting fit.
You’ll opt for a screw when cost matters and frame metal is intact.
Choose hinge replacement for repeated failures or upgraded fit.
Consider fashion trends for appearance and material sustainability—repairing conserves resources, but sometimes durability justifies a full hinge swap.
Where to Buy Exact Replacement Eyeglass Screws Online
If you decide a screw will do, you’ll want the exact match — size, thread, head style and finish — to keep your frames secure and looking right.
Shop specialist retailers that note measurements and brand fit, since Fashion trends and Eyewear history affect styles.
Try:
- Manufacturer parts
- Optical shops
- Online marketplaces
- Niche screw suppliers
- DIY eyewear stores
What to Look for in an Eyeglass Screw Kit
Because a good kit saves time and keeps your glasses secure, focus on fit, quality and the tools included before you buy.
Check screw sizes, durable materials and corrosion resistance so they won’t damage lens coatings.
Prefer kits with magnetic or precision drivers, spare nose pads and a compact case.
Consider styles that match fashion trends, but prioritize compatibility and reliability over looks.
How to Match OEM Screws Using Frame Make/Model
Although frame manufacturers vary widely, you can usually match OEM screws by tracking the exact make and model and comparing their specifications against parts charts or manufacturer guides.
Although manufacturers differ, matching OEM screws is usually possible by tracking exact make/model and checking parts charts.
You’ll confirm size, head type, and thread.
- Note make/model
- Check parts chart
- Measure screw dimensions
- Search manufacturer guide
- Verify head style
Keep fashion trends and celebrity endorsements in mind for style accuracy.
When to Use an Optical Repair Shop or Jeweler
Once you’ve confirmed the exact screw size and head type, know when to hand the repair off to a pro: use an optical repair shop or experienced jeweler when the frame has delicate materials, complex hinges, or lenses that could be scratched or misaligned. They’ll protect lenses, preserve Fashion trends, and advise on Glasses customization.
| Situation | Benefit | Who |
|---|---|---|
| Delicate frame | Prevent damage | Jeweler |
| Complex hinge | Proper tool fit | Tech |
| Coated lens | Avoid scratches | Shop |
DIY: Replacing a Hinge Screw Step‑by‑Step
If your glasses hinge is loose or missing a screw, you can replace it at home with a few simple tools and a steady hand. This step-by-step guide will walk you through removing the old screw, selecting the correct replacement, and installing it so the frame sits true and the hinge moves smoothly.
- Gather precision screwdriver, replacement screw, magnifier
- Check frame materials for compatible screw
- Match thread and length
- Clean hinge, consider lens coatings protection
- Tighten securely, test movement
DIY: Replacing a Nose‑Pad Screw Step‑by‑Step
When your nose pad screw is loose or missing, you can replace it yourself with a few small tools and a steady hand.
This brief guide will walk you through removing the old screw, choosing the right replacement, and reinstalling it so the pad sits securely and comfortably.
Unscrew remaining hardware, match screw size to frame materials and pad style, avoid touching lens coatings, insert new screw, tighten gently, test fit.
Preventive Maintenance to Avoid Screw Issues
After you’ve replaced a nose‑pad screw, spend a few minutes each month checking all frame screws so small problems don’t become broken ones. You’ll keep glasses aligned with current Fashion trends and protect frame color while avoiding surprises.
Check for looseness, corrosion, stripped heads, missing screws, and correct torque.
- wiggle test
- visual corrosion
- screw head fit
- missing parts
- gentle tightening
Signs a Replacement Screw Was Installed Incorrectly
Notice anything off with your glasses after a repair? If frames wobble, lenses misalign, or screws loosen quickly, a replacement screw was likely installed incorrectly.
You’ll spot mismatched finishes or unfamiliar shapes that clash with fashion trends.
Poor thread engagement and reduced material durability cause recurring issues.
Have the repairer recheck screw size, seating depth, and torque to prevent further damage.
When Warranty or Manufacturer Repair Is the Better Option
If a repair keeps failing or you spot signs of an incorrect replacement screw, consider whether warranty coverage or a manufacturer repair would serve you better.
You’ll want reliable fixes that respect unique sizing, Fashion trends preferences, and proper Lens cleaning instructions. Check:
- warranty terms
- authorized service
- part authenticity
- turnaround time
- documentation needed
Cost Comparison: DIY Parts vs Professional Repair
While DIY screws and kits can cost only a few dollars, you’ll want to weigh that against the time, tools, and risk of mismatches. You can save money, follow fashion trends, or honor historical innovations by repairing yourself, but professionals offer speed, correct sizing, and warranty. Compare costs and outcomes below.
| Option | Typical Benefit |
|---|---|
| DIY parts | Low cost |
| Professional | Correct fit |
| DIY time | Learning |
| Professional speed | Reliability |
Safety and Environmental Tips for Tiny Eyeglass Screws
Whether you do the repair yourself or hire a pro, handle tiny eyeglass screws with care: they’re choking hazards, can scratch lenses or skin, and can clog drains or get lost in the environment.
- Use a magnetic tray
- Wear protective gloves
- Keep screws away from children and pets
- Recycle metal parts properly
- Store spares labeled with fashion trends or brand logos
Quick Troubleshooting Checklist for Screw Fit Issues
Start by checking the screw dimensions to make sure length and thread diameter match your frame.
Inspect the frame threads for damage or debris that could prevent a proper fit.
If you’re unsure, test with a spare kit to find the best match before tightening.
Check Screw Dimensions
How big is the screw you’re using? Check dimensions before blaming the frame; fashion trends or brand comparisons don’t change thread pitch.
Measure length, diameter, head type, thread pitch, and material to match replacements.
- Length in mm
- Diameter across threads
- Head style (flat, pan)
- Thread pitch (coarse/fine)
- Material (steel, titanium)
Inspect Frame Threads
After you’ve confirmed the screw dimensions, check the frame threads to make sure they’ll accept the replacement. Inspect for stripped, cross-threaded, or clogged threads and clean gently.
Consider frame material—metal holds threads differently than plastic or acetate—and whether lens shape affects mounting angle.
If threads are damaged, retap cautiously or fit a thread insert; avoid forcing mismatched screws.
Test With Spare Kit
When you’ve got the spare kit in hand, try fitting the likely screw sizes before you commit to drilling, tapping, or buying parts.
You’ll quickly confirm fit, thread engagement, and head style, keeping your frames aligned with fashion trends and eco friendly materials choices.
- Match head style to hinge
- Check thread depth
- Test for wobble
- Note thread pitch
- Keep spare labels readable
Resources and Tools to Keep for Long‑Term Maintenance
Because small screws and worn parts will surprise you at the worst times, keep a compact kit of essentials for long‑term maintenance. You’ll want a mini screwdriver set, spare screws and nose pads, a magnifier, microfiber cloths for lens cleaning, and a small bottle of safe cleaner.
Track fashion trends for replacement frames and store a list of local repair shops and part suppliers.
Frequently Asked Questions
Can Magnetized Screwdrivers Damage Lens Coatings?
No, magnetized screwdrivers won’t damage lens coatings; you’re unlikely to cause magnetic interference with coatings, but you should check screwdriver compatibility to avoid stray bits or excessive force that can scratch or chip lenses.
How to Identify Counterfeit Replacement Screws?
You check counterfeit replacement screws by inspecting fit, finish, and screw threading, comparing corrosion, head markings, and tolerance against originals; test against frame and lens material for stress, and verify vendor authenticity and packaging details.
Are Titanium Screws Worth the Extra Cost?
Like a tiny anchor in a storm, you’ll find titanium durability outweighs rust-prone alternatives; you’ll pay more upfront, but its longevity and lightness improve cost effectiveness, so you’ll often save time and replacements long-term.
Do Anti‑Corrosion Coatings Change Thread Fit?
Yes—you’ll sometimes notice slight thread compatibility changes because coatings add thickness; durable anti‑corrosion coatings can alter fit, so you’ll want precision plating or adjusted tap sizes to preserve thread compatibility and maximize coating durability.
Can Screw Size Affect Frame Alignment and Vision?
Yes — screw size can shift frame alignment and alter your vision; you’ll notice reduced frame stability if you use incorrect screw compatibility, so always choose precisely matched screws to keep lenses positioned and vision sharp.
Conclusion
So no, not all glasses screws are the same size—you’ll usually need specific lengths, diameters, and thread types for a proper fit. Around 1 in 5 eyeglass repairs fails because the wrong screw was used, so matching specs matters for durability and comfort. Keep a tiny screw kit and a jeweler’s screwdriver set, and when in doubt bring frames to a pro to avoid stripping threads or losing components.
