Can You Attach a Ring Doorbell Without Screws? Easy No-Drill Methods
Yes — you can mount a Ring doorbell without screws using adhesive mounts, over‑the‑door or clamp brackets, strong magnetic plates, or freestanding posts. These no‑drill options work well on smooth siding, metal doors, and rental properties, and they avoid permanent damage. Expect tradeoffs: adhesives can weaken with weather and magnets need heavy pull force. Consider power needs, theft prevention, and seasonal checks — keep going to see specific methods, pros, and when to drill instead.
Quick Answer: Can You Attach a Ring Doorbell Without Screws?
If you want to avoid drilling, you can mount a Ring doorbell without screws using adhesive mounts, no-drill brackets, or a freestanding stand designed for video doorbells.
These options work well on smooth surfaces and in rental situations but may not be as secure long-term as screws.
You’ll get decorative options and consider aesthetic considerations when choosing finishes, colors, and placement to match your entry.
Who Should Choose a No‑Drill Ring Doorbell Install
When you rent, have brittle or historic siding, or want a temporary setup for events or short-term stays, a no‑drill Ring doorbell makes sense. It lets you get video coverage without altering walls, complying with lease rules, or risking damage to delicate surfaces.
You should choose no‑drill if you prioritize installation speed, minimal marks, easy removal, or aesthetic integration with trim, paint, or decor.
When to Skip No‑Drill and Drill Instead
If your wall won’t support an adhesive mount or looks like it could crumble, you should consider drilling for a secure install.
You’ll also want to drill if the doorbell will face heavy weather or if you need a tamper‑resistant, long‑term mount.
Let’s look at how structural issues, exposure, and security needs change the best approach.
Structural Integrity Concerns
Because a secure mount depends on the strength of the wall and frame, you should skip no‑drill options whenever the siding, masonry, or door material can’t reliably hold adhesive plates or straps.
You’ll need structural reinforcement and assess material compatibility before choosing anchors.
If the substrate crumbles, flexes, or lacks backing, drill and use proper anchors or through‑bolts to guarantee long‑term safety and alignment.
Weather Exposure Risks
Although adhesive mounts can look clean and simple, you should skip no‑drill options when your entry gets heavy sun, driving rain, or wide temperature swings that will degrade tapes and plastics.
You’ll want a drilled mount if UV from solar energy fades adhesives or seals fail during storms.
For reliable smart home integration and continuous power, choose a permanent, weatherproof installation rather than temporary fixes.
Long‑Term Security Needs
When you need long-term theft deterrence and tamper resistance, skip no‑drill mounts and go with a drilled installation. You’ll get better long term durability, stronger anchoring, and reduced risk of device loss.
Choose proper anchors and weatherproof seals to protect electronics.
Also weigh environmental impact: drilling may be more permanent but prevents frequent replacements, lowering long-run waste and resource use.
Which Ring Doorbell Models Work Best Without Screws
If you want a Ring doorbell that’s easy to install without screws, focus on battery-powered models and those with flat backs that mate well with adhesive mounts or no-drill brackets.
You’ll find newer battery Ring models, like Video Doorbell (2nd Gen) and Stick Up Cam Battery, suit creative mounting ideas and DIY customization. They’re lightweight, removable, and work with pads, straps, or magnetic mounts.
Tools & Supplies for No‑Drill Ring Doorbell Installs
Now that you know which Ring models work best without screws, let’s look at the tools and supplies you’ll need to mount one cleanly and securely. You’ll want adhesive mounts, weatherproof tapes, a level, cleaning supplies, and optional magnetic plates for Smart home integration and aesthetic customization.
| Item | Purpose | Tip |
|---|---|---|
| Adhesive mount | Secure | Clean surface |
| Weather tape | Seal | Press firmly |
| Magnetic plate | Optional | Align before sticking |
| Level | Straight | Bubble centered |
| Cleaner | Prep | No residue |
Pick the Right Mounting Height and Angle
Because camera angle determines what you’ll see most, place your Ring so the lens sits about 48–54 inches off the ground and tilts slightly downward toward the entry path.
Consider aesthetic considerations—align height with door trim and avoid blocking features.
If you’re on a property with historical building restrictions, check allowed placements and use reversible, noninvasive mounts to respect regulations and curb appeal.
Surface Prep for Reliable Adhesive Bonding
When prepping a mounting surface, you’ll want it clean, dry, and free of loose particles so adhesive can form a strong bond.
Wipe with isopropyl alcohol, let fully dry, and sand glossy paints lightly to improve surface texture.
Consider color matching if aesthetics matter—prime or touch up edges after mounting.
Test a small area to confirm adhesion before final placement.
Choosing 3M Command Strips for Ring Doorbell Mounts
If you want a no-drill mounting that stays secure, choose 3M Command Strips rated for the weight and outdoor conditions of your Ring doorbell.
Clean the surface, press firmly, and wait the recommended time before hanging.
Consider exposure, tilt for motion range, and accessory power options like wireless charging or solar power.
- Check weight rating
- Prep surface
- Test stability
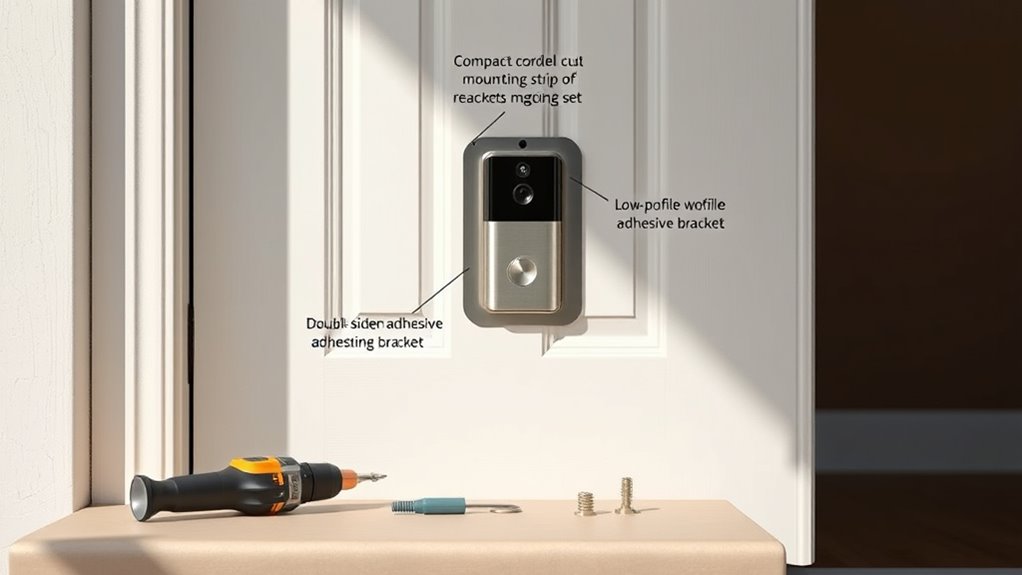
Industrial Double‑Sided Tape: When and How to Use It
Although not as household-familiar as Command strips, industrial double‑sided tape gives you a low-profile, high-strength option for mounting a Ring without drilling; you’ll pick it when the surface is smooth, the weight is within the tape’s rating, and you want a nearly invisible bond. Use industrial tape and mounting adhesives rated for outdoor use; prep, press, cure.
| Surface | Tip |
|---|---|
| Metal/Glass | Clean, dry |
| Painted wood | Test adhesion |
Heavy‑Duty Outdoor Adhesives: Safe Usage Tips
Because heavy-duty outdoor adhesives bond differently than tapes, you’ll want to follow specific safety steps to get a secure, lasting mount without damaging your Ring or the surface.
Because heavy-duty adhesives bond differently than tape, follow safety steps for a secure, lasting mount without damage.
Use adhesives with proven adhesive durability and check surface compatibility first. Clean, dry, and score surfaces. Apply sparingly, press firmly, and let cure fully.
- Prep
- Apply
- Cure
Step‑by‑Step: Adhesive Mounting Plate Install
First, you’ll clean and dry the mounting surface, removing oils and debris so the adhesive can bond properly.
Next, you’ll align the plate precisely using a level or guide marks before pressing it firmly into place.
Finally, you’ll let the adhesive cure for the recommended time and test the bond gently before attaching the doorbell.
Surface Preparation Steps
Before you stick the adhesive mounting plate, make sure the surface is clean, dry, and smooth so the tape bonds properly. Check surface texture and paint compatibility to avoid peeling or weak adhesion.
Then:
- Wipe area with isopropyl alcohol; let it fully dry.
- Lightly sand glossy paint to improve grip.
- Remove dust with a tack cloth before applying the plate.
Adhesive Plate Alignment
When you’re ready to mount the adhesive plate, position it carefully and check alignment against the doorbell’s viewing angle and the edges of your doorframe so the camera captures the area you want.
Hold the plate level, verify clearance for an optional solar panel, and make sure it won’t block sensors tied to a security alarm.
Mark edges lightly, press firm, then release.
Curing Time And Testing
If you’ve pressed the adhesive plate into place, give it time to cure fully so it reaches its rated bond strength. Most adhesives need 24–48 hours, though some fast-curing formulas set in as little as an hour.
Follow the curing process and then run testing procedures:
- Wait specified cure time.
- Gently tug to check bond.
- Test doorbell function and motion alerts.
Over‑The‑Door Brackets: Pros and Cons for Ring
Although over‑the‑door brackets skip drilling and installation hassle, they come with tradeoffs you should know about. You’ll enjoy quick setup and creative decor flexibility, plus no permanent changes.
But brackets can obstruct the door, reduce weather sealing, and raise security concerns since they’re easier to tamper with. They suit renters temporarily, but weigh convenience against reduced protection and stability.
How to Install an Adjustable Over‑The‑Door Hook for Ring
Because you want a secure, non‑permanent way to mount a Ring, an adjustable over‑the‑door hook gives you quick installation without drilling. You’ll lift the door, slip the hook over the top, adjust height and angle, and secure padding to protect finish.
Position, adjust, protect — an adjustable over‑the‑door hook gives secure, drill‑free Ring mounting in minutes.
Consider historical significance and cultural symbolism of door hardware as design context.
- Position
- Adjust
- Protect
Magnetic Door‑Mounted Mounts: When They Work
Magnetic door‑mounted mounts can be a quick, no‑drill option if your door and the magnet’s pull are compatible. You’ll need to check magnetic strength limits against the Ring’s weight and the door material for a reliable hold.
Also consider how easily the mount could be tampered with or removed, since magnets offer less security than screwed mounts.
Magnetic Strength Limits
When you rely on a door‑mounted magnetic mount, the magnet’s pull must exceed the forces from bumps, wind, and the weight of the Ring without risking damage to the door finish.
You’ll weigh magnetic limitations against adhesive strength and choose high‑grade magnets plus protective pads.
Consider:
- Peak pull force rating
- Safety margin for shocks
- Corrosion and finish protection
Surface Compatibility
After checking magnet strength and protection, you’ll want to match the mount to the door’s surface—some finishes and materials play far better with door‑mounted magnetic systems than others. You’ll prefer smooth metal, painted wood, or sealed composite; porous stone or ornate Historical architecture details may resist attachment and raise aesthetic considerations.
| Good surfaces | Poor surfaces |
|---|---|
| Smooth metal | Carved stone |
| Painted wood | Rough brick |
| Sealed composite | Delicate trim |
Security And Tampering
How secure is a door‑mounted, magnet‑held Ring in real use? You can get convenience, but you must weigh tamper risk, Hacking vulnerabilities, and Privacy concerns. Consider these points:
- Magnetic mounts can be ripped off quickly if not shielded.
- Weak attachment invites theft even without electronic compromise.
- Tamper sensors help, but won’t stop sophisticated intruders or network attacks.
Temporary Clamp Mounts for Metal Doors
If you don’t want to drill into a metal door but still need a secure mount, temporary clamp mounts give you a strong, non-permanent option.
You can clamp to edges without harming metal door durability, adjust height easily, and remove later.
Choose padded clamps to avoid scratches, test stability, and weigh adhesive brand comparison only if pairing with adhesives for extra hold.
Removable Adhesive Brackets for Brick and Concrete
When you need a no-drill option for rough surfaces like brick or concrete, removable adhesive brackets let you mount a Ring safely without permanent damage. You’ll protect Historical architecture and respect Interior decor while keeping functionality.
- Choose high-bond masonry adhesive pads rated for weight.
- Clean and prime the surface thoroughly.
- Test and remove gently to avoid residue.
Mounting a Ring to a Mailbox or Gate (No Drilling)
Because mailbox and gate surfaces vary, you’ll want a secure, noninvasive solution that won’t damage metal or vinyl while keeping your Ring stable and weatherproof. Use heavy-duty velcro straps, clamp mounts, or adhesive-backed brackets; mind aesthetic considerations and cultural differences for placement. Test stability and seal gaps against rain.
| Option | Use |
|---|---|
| Velcro straps | Temporary, adjustable |
| Clamp mounts | Strong, noninvasive |
| Adhesive brackets | Low-profile, weatherproof |
Freestanding Porch Post or Stake Options
Although you don’t want to drill into brick or siding, a freestanding post or stake gives you a sturdy, portable mounting point for a Ring that won’t touch your house. Choose a weather-resistant material and a height that keeps the camera angle clear of obstructions and within Wi‑Fi range.
A freestanding, weatherproof post offers a sturdy, non-invasive mount that keeps your Ring clear of obstructions and within Wi‑Fi range
- Weighted porch post for stability, echoes historical significance of gateposts.
- Ground stake with concrete sleeve; simple cultural symbolism of a threshold.
- Decorative planter-mounted stake blending function and aesthetics.
3D‑Printed Adapters and Custom Non‑Invasive Brackets
You can design clips to fit your siding profile, add bird deterrents to prevent pecking, route wiring for solar panel integration, and use durable filament for weather resistance while keeping removal and repositioning simple.
Tension Rod or Vertical Pole Mounts for Entryways
When you can’t or won’t drill into trim, a tension rod or vertical pole mount gives you a sturdy, temporary way to position a Ring Doorbell at your entryway. These mounts use adjustable compression between floor and ceiling or between porch floor and soffit so you can install and remove the device without penetrating surfaces. You’ll avoid trim damage and keep wiring tidy.
- Easy repositioning
- Compatible with garden lighting posts
- Keeps pests away for pest control
Routing Power Without Drilling: Surface Conduit & Clips
You can run power to your Ring without drilling by using surface-mounted conduit to protect wires along walls. Try adhesive cable clips for a quick, non-permanent route, or choose a slim concealed raceway for a cleaner, low-profile look.
Each option lets you keep wiring neat and removable while matching your entryway’s aesthetics.
Surface-Mounted Conduit Routing
If you want a clean, noninvasive way to route power to a Ring doorbell, surface-mounted conduit and adhesive clips keep wiring neat without drilling into brick or stucco.
You can run cable along trim, tuck into corners, and protect wiring with rigid or flexible surface mounted conduit.
Consider these routing options:
- Corner runs
- Trim concealment
- Short exterior drops
Adhesive Cable Clip Options
Several strong adhesive cable clips make no-drill Ring doorbell installs tidy and secure. They stick to most siding, brick, and stucco without marring surfaces.
You’ll choose clips rated for outdoor use and test adhesive strength before mounting.
Place clips every 6–12 inches along your surface conduit, route wires neatly for ideal cable management, and allow full cure time to guarantee a durable, damage-free hold.
Concealed Raceway Installation
When planning a concealed raceway install, think through the path from your Ring’s power source to the doorbell so you can hide the surface conduit cleanly along trim, corners, or under eaves; you’ll preserve vintage decor while enabling smart home integration.
Consider these steps:
- Choose low-profile conduit matching trim color.
- Use adhesive clips rated for outdoor use.
- Route near gutters or under eaves for concealment.
Power Options: Battery vs Hardwired for No‑Drill Installs
Choosing between battery and hardwired power for a no‑drill Ring Doorbell comes down to tradeoffs in convenience, maintenance, and reliability.
You’ll weigh Battery longevity versus constant Power source availability: battery installs are easy, portable, and need periodic recharging.
Hardwired alternatives offer uninterrupted power and fewer interruptions but usually require adapters or existing doorbell transformers and more complex, noninvasive routing.
Weatherproofing Adhesives and Mounts Outdoors
Once you’ve picked battery or hardwired power, you’ll need mounting and adhesive choices that stand up to sun, rain, and freeze–thaw cycles.
Choose UV-resistant tapes or marine-grade adhesives, and consider mounts with rubber gaskets.
Include solar panel or power bank accessories for uninterrupted operation.
- Marine-grade adhesive
- UV-resistant tape
- Gasketed weatherproof mount
How Temperature and Humidity Affect Adhesives
You’ll notice temperature plays a big role in adhesive performance, with extreme cold making some glues brittle and heat softening others.
Humidity can weaken water-sensitive adhesives or interfere with curing, so you’ll want products rated for damp conditions.
Expect bond strength to change with the seasons and plan mounting and maintenance accordingly.
Temperature Effects On Adhesives
Although adhesives can make mounting a Ring doorbell simple, temperature and humidity greatly change how well those adhesives stick and last. You’ll notice temperature fluctuations speed adhesive aging and weaken bonds.
Consider these effects when choosing mounting options:
- High heat softens glue, reducing hold.
- Freezing cold makes adhesives brittle.
- Rapid swings cause expansion/contraction fatigue, shortening lifespan.
Humidity’s Impact On Glue
When humidity rises, adhesives absorb moisture and soften, which cuts their initial tack and long-term strength.
You’ll notice reduced grip on painted or porous surfaces as humidity effects accelerate adhesive deterioration.
To install your Ring without screws, pick products labeled for high-humidity use, prep surfaces thoroughly, and wait for a dry day.
Monitor bonds periodically for slipping or residue.
Seasonal Bond Strength Changes
Because temperature and humidity swing with the seasons, your adhesive’s grip can change dramatically over the year. You’ll notice Seasonal fluctuations that weaken or stiffen glue, affecting Bond durability for no-drill mounts.
Prepare and test before mounting, especially across temperature swings.
- Test adhesion on similar surface.
- Use weather-rated tapes or pads.
- Re-evaluate bond after seasonal shifts.
Securing a Ring Against Theft and Tampering
Worried someone might snatch or disable your Ring? Use screw alternatives like security plates, adhesive anchors, and anti-tamper covers for theft prevention. Anchor strongly, hide wiring, and enable alerting features so you’ll respond fast. Consider visible deterrents and camera positioning to reduce reach.
| Item | Benefit | Tip |
|---|---|---|
| Security plate | Anchor | Use strong adhesive |
| Anti-tamper cover | Deterrent | Lock or clip |
| Adhesive anchor | No-drill | Clean surface first |
Balancing Removable vs Semi‑Permanent Mounts
You’ll weigh removability against stability when choosing a no-drill mount, since easily removable options trade permanence for convenience.
Adhesive mounts can be quick and clean to install but may lose grip in extreme weather or damage paint when removed.
Consider temporary security measures like tethering or alarm settings if you need a non-permanent solution that still deters theft.
Removability Versus Stability
How permanent do you want your Ring to feel? You’ll weigh removability against stability, accepting aesthetic compromise to protect surface durability.
Choose based on access, weather, and theft risk.
- Temporary: easy removal, lower stability.
- Semi‑permanent: better hold, some aesthetic compromise.
- Permanent: maximum stability, reduced removability.
Adhesive Mount Pros/Cons
If you want a no-drill option that still holds reliably, adhesive mounts strike a middle ground between easy removal and semi‑permanent stability.
You’ll enjoy cleaner aesthetic appeal without screws, and many adhesives resist weather.
Consider surface type, adhesive strength, and Fire safety—avoid flammable mounting near heat sources.
Removal can be clean but may need heat or solvent, so plan accordingly.
Temporary Security Considerations
When deciding between removable and semi‑permanent mounts, weigh how long you need reliable coverage versus how easily you might need to take the doorbell down. You’ll balance theft risk, privacy concerns, and aesthetic impact when choosing.
Consider:
- Short-term: easy removal, lower theft deterrence.
- Semi‑permanent: stronger hold, better deterrence.
- Compromise: security screws with adhesive cover for looks.
How to Angle and Level Your Ring for Best View
Although you’re working without tools, you can still get a clear, useful view by angling and leveling the Ring carefully. Aim the camera slightly downward to capture faces and the porch but avoid showing too much ground.
Rotate the unit left or right until the entryway and approach path are centered in frame. Use small adjustments for aesthetic enhancements and seasonal adjustments to maintain ideal coverage.
Quick Tests to Verify Mount Strength
Before you finish, give the mount a few simple checks to make sure it will hold: press firmly on the doorbell from different angles, tug gently downward and sideways, and bounce the surface lightly to detect any looseness or peeling.
- Check adhesion: verify tape or adhesive bonds fully.
- Monitor tilt: confirm no gradual sag affecting battery maintenance.
- Simulate use: trigger motion/light to spot shifts without Wi Fi troubleshooting.
Managing Wi‑Fi When Relocating Your Ring
When you move your Ring, update the device address in your Ring account so alerts and location-based features keep working.
Then reconnect the doorbell to your home’s Wi‑Fi and run the setup in the Ring app to guarantee it pairs correctly.
Finally, check signal strength and try small changes—like shifting the router, using a Wi‑Fi extender, or adjusting the Ring’s mounting spot—to improve reliability.
Updating Ring Account Location
Moving your Ring to a new address? Update your account promptly so notifications, location-based features, color options display correctly, and battery life alerts match local settings.
Quick steps:
- Open the Ring app and go to Device Settings.
- Edit Address and verify via map.
- Confirm timezone and emergency service info.
This keeps motion alerts and legal info accurate after relocation.
Reconnecting Ring To Wi‑Fi
If you’re relocating your Ring, you’ll need to reconnect it to the new Wi‑Fi so it stays online and delivers alerts reliably. The process is quick if you have your network name and password ready.
Open the Ring app, go to Device Settings > Change Wi‑Fi Network, and follow prompts.
Reconnecting guarantees remote access and lets the device receive firmware updates so features and security stay current.
Optimizing Signal Strength
After you reconnect your Ring to the new network, check and improve its Wi‑Fi signal so livestreams, notifications, and updates don’t lag or drop.
- Move your router or Ring to reduce signal interference and test RSSI.
- Use a wireless power source or relocate to guarantee stable placement and range.
- Add a mesh node or extender to boost coverage without drilling or complex wiring.
Troubleshooting Motion Alerts and Recording Issues
When your Ring isn’t sending motion alerts or saving clips, start by checking basic connectivity and settings so you can quickly isolate the problem. Troubleshooting connectivity and optimizing firmware help. Restart the device, verify Wi‑Fi signal, and confirm subscription status. If recordings fail, check SD/cloud settings and storage. Contact support if needed.
| Step | Action |
|---|---|
| 1 | Restart device |
| 2 | Check Wi‑Fi |
| 3 | Update firmware |
| 4 | Verify storage |
Preventing False Alerts With Proper Placement
You’ll get fewer false alerts by mounting your Ring at the right height so motion zones match human movement, not small animals.
Tilt the camera to adjust the field of view and avoid pointing at busy streets or tree branches.
Move or block nearby motion sources like bushes, driveways, or reflective surfaces to keep alerts relevant.
Optimal Mounting Height
Although a Ring’s motion sensors are sensitive, mounting it at the right height makes false alerts far less likely. Aim for a position that centers the camera 48–54 inches above the ground. You’ll balance detection and privacy while preserving doorbell aesthetics and achieving aesthetic enhancement.
- Match eye level for visitors.
- Avoid driveway glare.
- Keep pets below sensor range.
Angle And Field Of View
Aim downward slightly to focus on your porch and approach path, reducing false alerts.
Check sensor calibration and apply firmware updates regularly so motion zones remain accurate, and adjust angle if you notice spurious triggers.
Reduce Nearby Motion Sources
When placing your Ring, keep nearby motion sources — like busy sidewalks, tree branches, and driveways shared with neighbors — out of its view so your device focuses on real visitors instead of constant background activity.
You’ll reduce false alerts, improve noise reduction, and maintain aesthetic enhancement.
Choose placement that limits motion and blends with surroundings:
- Point away from sidewalks.
- Trim nearby foliage.
- Angle toward your door.
Removing Adhesive Mounts Cleanly From Surfaces
If you want to remove an adhesive Ring mount without damaging paint or siding, start by softening the adhesive with heat—use a hair dryer on medium for a few minutes or a heat gun briefly.
Then gently pry the edges with a plastic card or trim tool, working slowly to avoid gouging the surface.
After removal, do surface cleaning with isopropyl alcohol to finish adhesive removal.
Repairing Paint or Finish After Mount Removal
Although the adhesive pull may’ve left minor scars or paint lift, you can restore the surface with a few careful steps. Start by cleaning residue, sanding lightly, and using appropriate filler for gouges.
Although adhesive pull can scar or lift paint, gentle cleaning, light sanding, and proper filling will restore the surface.
For Paint repair and Finish touch ups, follow this quick checklist:
- Clean and sand surface.
- Apply filler and sand smooth.
- Prime and match paint or finish.
Seasonal Maintenance for Non‑Drilled Mounts
Curious how to keep a no-drill Ring Doorbell mount performing season after season? Inspect adhesive and brackets each change of season, clearing seasonal flora like leaves and pollen to prevent moisture buildup.
Tighten removable clips, replace worn adhesive strips, and treat gaps with weatherproof sealant.
Include pest prevention: block insect entry points and check for nests to protect wiring and preserve mount integrity.
Cost Comparison: No‑Drill vs Drilled Installation
When you’re weighing options, no‑drill mounts usually cost less up front because they skip labor and specialized tools. You’ll save on installation and avoid wall repairs.
But consider long‑term durability, design aesthetics, and environmental impact when choosing.
Also weigh long-term durability, visual style, and environmental impact before deciding.
Compare total costs over time:
- Initial purchase and install
- Maintenance and replacements
- Repair and resale implications
Best No‑Drill Mount Products and Brands
You’ll find two main no‑drill mount types worth considering: high‑strength adhesive brackets and magnetic mounts.
Adhesive options like 3M Command variants work well on smooth surfaces.
Magnetic brands such as Ring’s own magnet-ready plates and third‑party MetalVision offer quick removal and reattachment.
Compare holding strength, weather resistance, and ease of installation to pick what fits your entryway.
Adhesive Mount Options
If you want a secure Ring Doorbell without drilling, adhesive mounts give you a fast, clean option that’s easy to install and remove.
You’ll find durable brands with clear color options and solid warranty coverage.
Choose based on weight rating and weather resistance.
- 3M VHB strips
- Command Outdoor Mounts
- Adhesive mounting plates
Magnetic Mount Brands
Because magnetic mounts snap on and off without tools, they’re one of the quickest no‑drill solutions for a Ring Doorbell. You’ll pick brands that balance magnetic durability and adhesive longevity. Check weight ratings and surface specs before buying; look for weatherproof coatings and strong adhesives so your doorbell stays secure.
| Brand | Notable Feature |
|---|---|
| Brand A | High magnetic durability |
| Brand B | Excellent adhesive longevity |
| Brand C | Weatherproof finish |
Common Mistakes That Cause No‑Drill Failures
When a no‑drill Ring install fails, it’s usually due to a handful of avoidable mistakes: choosing the wrong adhesive or surface, skipping proper cleaning, misaligning the mount, or neglecting battery charge and Wi‑Fi strength.
- Ignore surface prep and adhesive ratings — leads to drops.
- Overlook Aesthetic considerations or community regulations — causes complaints.
- Mount crookedly or place where signal’s weak; test battery first.
ADA‑ and Visitor‑Friendly No‑Drill Placements
Mistakes like poor surface prep or crooked mounting don’t just cause no‑drill failures — they can also make your doorbell hard to use for people with disabilities or visitors carrying packages.
You should aim for compliant mounting height, clear sightlines, and slip‑resistant adhesive.
Choose high‑contrast color options or add a visible plate so seniors and low‑vision guests can find it quickly without stooping or stretching.
Legal and Landlord Considerations for Renters
Worried about drilling into a rental doorframe? You’ll want clear landlord permissions and to address privacy concerns before installing any doorbell. Consider these steps:
- Ask written permission specifying non‑drill method and removal responsibility.
- Confirm local rules or HOA restrictions that affect security devices.
- Use temporary mounts and document pre/post photos to protect your deposit and prove reversible changes.
When to Hire a Pro vs DIY
Decide whether you can handle the job based on the skills and tools required—simple adhesive or mounting plate installs you’ll likely manage, but complex wiring or weatherproofing might need a pro.
Weigh the cost of hiring someone against your time and the convenience of a guaranteed, tidy install. If you’re unsure or short on tools, calling a professional can save hassle and prevent damage.
When To Call
If you’re comfortable with basic tools and following clear instructions, you can usually install a no-drill Ring Doorbell yourself. However, call a pro when the job involves complex wiring, unstable mounting surfaces, or local building rules that require permits.
Also consider pros for battery maintenance concerns and to guarantee user privacy.
- Complex wiring or old wiring
- Unstable or stucco surfaces
- Permit or HOA restrictions
Skill And Tools Needed
Now that you know when to call a pro, consider what skills and tools the job actually requires so you can decide whether to DIY.
If you’re handy, basic tools, level, and patience handle adhesive mounts while preserving aesthetic appeal.
If you dread wiring, alignment, or weatherproofing, those DIY challenges add risk.
Hire a pro when precision or warranty concerns outweigh cost savings.
Cost Versus Convenience
When weighing cost versus convenience, think about how much your time, comfort with tools, and tolerance for small risks are worth compared with a pro’s fee.
You’ll do a Cost comparison and weigh Convenience factors:
- DIY: low monetary cost, higher time and risk.
- Professional: higher fee, fast and reliable.
- Hybrid: buy prep help, then DIY installation.
Upgrade Path: Move From Temporary to Permanent
Although a temporary no-drill setup gets your Ring working fast, you’ll likely want a more permanent, reliable installation that blends with your home and reduces maintenance. You’ll assess mounting options, wiring, and aesthetics while respecting historical significance and cultural symbolism of older façades. Choose a discreet hard-mount, hire pros if needed, then enjoy stability and cleaner lines.
| Step | Action |
|---|---|
| 1 | Inspect surface |
| 2 | Choose mount |
| 3 | Run wiring |
| 4 | Seal & finish |
Photo/Video Checklist to Follow During Install
Because you’ll want clear documentation for troubleshooting, warranty claims, and any future changes, take systematic photos and short videos at each stage of the install.
You’ll capture positioning, mounting surface, and wiring (if any). Include shots showing Creative decorating choices and record brief notes for Maintenance tips.
- Overall before/after
- Close-up of attachment points
- Short video of operation/tests
Case Studies: Real No‑Drill Ring Installs
You’ll see how no-drill mounts hold up on real porches, with examples of different surfaces and weather exposure.
You’ll also get apartment-friendly installs that use adhesive plates, hanging brackets, and door-jam solutions so you can avoid landlord issues.
Use these case studies to pick the approach that fits your entry and restrictions.
Real-World Porch Mounts
Curious how people actually mount Ring doorbells without drilling into their porch? You’ll see practical, tested approaches blending historical mount methods with modern adhesives and DIY decoration to match porch style.
Try these real-world options you can replicate today:
- Heavy-duty adhesive plate with weather seal.
- Tension-mounted bracket between trim and soffit.
- Decorative post clamp using rubberized straps and epoxy.
Apartment-Friendly Door Installs
Those porch solutions work well when you own or control exterior trim, but apartments need different thinking. You’ll use adhesive mounts, tension poles, or doorframe hooks to avoid drilling.
Tenants share examples: a balcony post uses heavy-duty tape behind garden decor to hide wiring; a hallway install relies on battery Ring and nearby indoor lighting for clear night video.
Get landlord approval when required.
Quick Decision Guide: Pick the Right No‑Drill Method
If you want a fast, reliable way to mount a Ring doorbell without drilling, start by matching your situation to the method that fits best — adhesive mounts for smooth surfaces, tension-mounted brackets for door frames, and angled or corner adapters for uneven siding.
- Adhesive: clean, flat surfaces; consider historical trends in materials.
- Tension: renter-friendly, no damage.
- Angled: accommodates siding, respects cultural symbolism of entryways.
Final Checklist Before You Finalize a No‑Drill Install
Now that you’ve matched your situation to a no‑drill option, run through a short checklist to make sure the mount will hold up and the doorbell will work as designed.
Check surface compatibility, adhesive cure time, and weight rating.
Confirm surface compatibility, adhesive cure time, and weight rating to ensure a secure, long-lasting no‑drill mount
Confirm camera angle, Wi‑Fi signal, and secure wiring or battery access.
Assess aesthetic integration and installation flexibility so the setup looks good and performs reliably.
Frequently Asked Questions
Can Adhesive Mounts Void My Ring Warranty or Service Coverage?
Using adhesive mounts can void warranty or service if they cause damage or alter your Ring, so check Terms of Service; you’ll still enjoy wireless installation and security cameras, but don’t expect coverage for adhesive-related failures.
How Do Adhesives Affect My Landlord’s Lease or Rental Rules?
You should check your lease agreement because adhesive restrictions can bar permanent fixes; if they do, ask your landlord for written permission or use approved no-damage alternatives, and don’t assume adhesives won’t violate rules or deposit terms.
Can I Hardwire Power Later Without Removing Adhesive Residue?
Yes — you can hardwire later, but you’ll need to remove adhesive residue first; otherwise mounting and wiring for security cameras and smart home integration can be compromised, so clean the surface thoroughly before installing.
What Are Theft-Deterrent Options for Removable Mounts?
Use alternative mounting methods like security plates, locking brackets, and tamper-proof adhesive pouches; combine theft prevention techniques such as anchor cables, surveillance signage, motion alerts, and visible screws to discourage theft while keeping mounts removable.
Do No-Drill Mounts Interfere With Ring’s Motion Detection Range?
Imagine a slightly tilted painting catching morning light: no, no-drill mounts usually won’t cut Ring’s motion detection range if you position it correctly, but Installation challenges and Mount stability can degrade coverage, so you’ll want careful alignment.
Conclusion
You can often attach a Ring doorbell without screws using sturdy adhesive, a no-drill mount, or a corner wedge—perfect if you rent or want a quick, damage-free fix. Choose no-drill for smooth, non-porous surfaces and temporary setups; drill when security or uneven surfaces demand it. Measure twice and follow the photo checklist—measure once, cut twice. With the right supplies and care, you’ll get a secure, neat install every time.