Can a Screw Be Longer Than the Anchor
Yes — you can use a screw longer than the anchor, but only if it properly engages the anchor’s threaded length without bottoming out or preventing expansion. Measure anchor embedment plus fixture thickness, pick a screw that fills 75–100% of the anchor’s threads, and avoid excessive protrusion that causes point loading, cracking, or snagging. Match materials and torque settings, and modify parts if needed; keep going for practical selection, installation, and failure-mode guidance.
Quick Answer: Can a Screw Be Longer Than the Anchor?
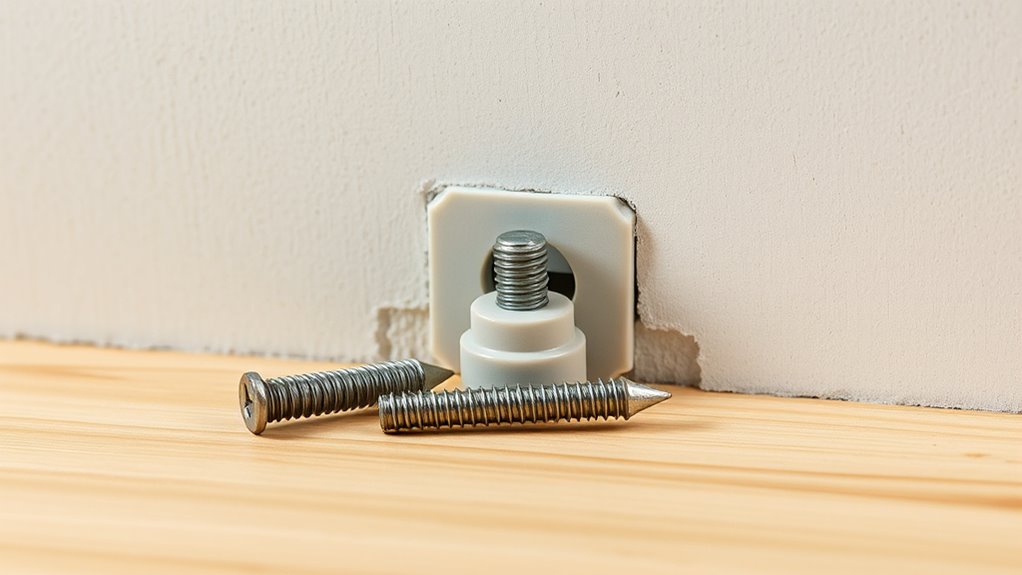
Yes — a screw can be longer than its anchor, and in many cases that’s intentional. You’ll often choose extra length to guarantee secure embedment beyond the anchor body.
But watch for anchor corrosion in harsh environments. Proper screw threading must match the anchor to avoid splitting or loosening.
If you use compatible materials and threading, the assembly stays stronger and lasts longer.
How to Measure and Pick the Right Screw Length (Step-by-Step)
First, measure how deep the anchor sits in the wall so you know the anchor embed depth.
Then add the thickness of the fixture you’re mounting.
Choose a screw long enough to pass through the fixture and fully engage the anchor.
Make sure the screw length allows proper engagement—typically several threads inside the anchor—for a secure hold.
Measure Anchor Embed Depth
Start by measuring how deep the anchor sits in the wall so you can pick a screw that engages the anchor without bottoming out or leaving too little thread.
Use a probe or depth gauge, note anchor materials to choose compatible screws, and allow clearance for protective coatings.
Check for signs of fastener corrosion when evaluating depth and replace compromised anchors before fastening.
Account For Fixture Thickness
When figuring screw length, measure the thickness of the fixture where the screw will pass and add that to the anchor’s embed depth so the screw threads fully engage the anchor without bottoming out.
Use calipers or a tape measure for accuracy, account for washers or paint buildup, and round up to the nearest common screw length to guarantee a secure fit.
- Check color contrast for visible heads
- Consider aesthetic considerations like head type
- Verify extra length won’t protrude or stress the fixture
Allow Proper Screw Engagement
How long should the screw be so it fully engages the anchor without bottoming out or sticking out? Measure anchor depth, add fixture thickness, and leave a few threads past the anchor’s end for secure engagement.
Pick a screw that matches that length, factoring color contrast and lighting conditions for visible alignment during install.
Test fit before final tightening to avoid damage.
Why Screw Length Matters for Safe Fixings
You need the right screw length to match the anchor so the load transfers correctly rather than stressing the anchor.
Proper embedment guarantees the anchor grips the base material and resists pullout under load.
If the screw is too short or too long, you compromise holding power and safety.
Screw Length Vs Anchor
Why does screw length matter for anchors? You need the right screw to guarantee secure hold, avoid protrusion, and maintain corrosion prevention through material compatibility.
Choose length that seats anchor fully without bottoming out or leaving threads exposed.
- Prevents structural stress
- Ensures reliable engagement
- Maintains environmental protection and longevity
Embedment And Pullout
Although it might seem like a small detail, screw length directly affects embedment depth and pullout resistance, and getting it right can turn a solid fix into a failure.
You must guarantee sufficient embedment for shear and pullout strength while balancing corrosion resistance and aesthetic considerations.
Too short reduces grip; too long risks substrate damage, protrusion, or compromised finish—choose length and material wisely.
How Anchors Work: Basic Mechanics and Failure Modes
When you fasten something into drywall, concrete, or masonry, the anchor has to convert pull and shear forces from the screw into bearing and friction against the surrounding material. Failures happen when that transfer breaks down.
You’ll check anchor material, seating depth, and screw corrosion risk to prevent pullout or shear failure.
- Poor embedment
- Material cracking
- Corrosion-induced loss
Plastic Expansion Anchors: What Happens With Long Screws
When you use a screw that’s much longer than a plastic expansion anchor, the anchor can only expand so far before it stops gripping the wall.
If the screw protrudes past the anchor, you risk point loading, reduced clamping force, and parts of the load being borne by the screw instead of the expanded anchor.
Consider how those limits change load distribution and the potential for pullout or material cracking.
Anchor Expansion Limits
If you drive a screw considerably longer than a plastic expansion anchor, you won’t expand properly and you can lose holding power. So it’s important to match screw length to anchor design and wall thickness.
You should check paint adhesion and surface preparation before installing anchors.
Consider limits to expansion depth, anchor compression, and substrate strength.
- Expansion depth limits
- Anchor compression risk
- Substrate strength considerations
Screw Protrusion Risks
After matching screw length to the anchor and wall thickness, you also need to watch how far the screw sticks out past the anchor. Too much protrusion can prevent the anchor from expanding correctly and can put shear stress on the screw instead of the substrate.
You should trim or replace overlong screws to guarantee corrosion prevention, reduce wobble, and meet aesthetic considerations while maintaining safe fixation.
Load Distribution Effects
Because the screw engages the anchor to transfer loads into the wall, a longer-than-needed screw changes how forces spread through the plug and substrate.
You’ll see concentrated stress at the anchor tip, reduced shear capacity, and possible substrate cracking.
Consider also color contrast and aesthetic appeal when screws protrude.
- Increased point loading
- Uneven load path
- Visible finish issues
Toggle and Molly Anchors: Correct Screw Lengths and Limits
When you’re using toggle or molly anchors, pick a screw that’s long enough to engage the anchor’s threaded portion fully but not so long that it bottoms out or prevents the anchor from expanding. Consider anchor materials and avoid mismatched metals to reduce screw corrosion. Choose screw length to allow full expansion and proper clamping without excess penetration.
| Anchor | Screw | Limit |
|---|---|---|
| Toggle | Match | 10mm |
| Molly | Match | 8mm |
Threaded Metal Inserts and Rivet Nuts: Allowed Screw Engagement
If you use threaded metal inserts or rivet nuts, pick a screw that engages the full depth of the insert’s threads without bottoming out or pulling through the component.
You’ll guarantee secure clamping, proper load transfer, corrosion prevention, and clean finishes.
Consider material compatibility and torque limits.
- Match screw length to insert depth
- Use compatible coatings for corrosion prevention
- Balance strength and aesthetic considerations
Concrete and Masonry Anchors: When Longer Screws Help or Hurt
Although longer screws can increase embedment in concrete and boost pull-out strength, they can also cause problems if they’re too long for the anchor system or substrate.
You should check material compatibility to avoid cracking or spalling and make certain the anchor expansion isn’t obstructed.
Longer screws may pierce backer materials or look awkward, so balance structural need with aesthetic considerations and code requirements.
Self-Drilling Anchors & Sheet-Metal Screws: Length Rules
Because self-drilling anchors rely on the screw to form their own pilot hole and the sheet-metal screw must bite fully into the material, you should match screw length to the metal thickness and any backing so the threads engage properly without protruding or bending the sheet.
Choose length for grip, corrosion, Color matching, and aesthetic considerations.
- Verify grip depth
- Prevent punch‑through
- Match finish and profile
Studs and Wood Anchors: When Longer Screws Are Preferred
When you’re fastening into studs or using wood anchors, choose a screw that penetrates well beyond the anchor body so you get solid purchase in the wood rather than relying solely on the anchor’s grip.
You’ll improve anchor durability by transferring loads into the stud and reduce wobble.
Pick coated screws to limit screw corrosion, matching length to thickness and avoiding over-drilling that weakens the timber.
Drywall Anchors vs. Hollow-Wall Anchors: Key Differences
If you’re anchoring something to a wall, pick the right anchor type. You’ll choose drywall anchors for light loads and hollow-wall anchors for heavier, vibration-prone items.
Consider paint preparation to avoid damage and use corrosion-resistant fasteners to prevent fastener corrosion over time.
- Drywall: easy install, light duty
- Hollow-wall: expanding or toggle styles
Check materials and environment
Load Types (Shear vs. Tension): How Screw Length Changes Failure Modes
Although shear and tension both act on screws, they stress anchors in very different ways. Screw length can shift which failure mode dominates.
You’ll see shorter screws favor shear failures at the anchor interface, while longer screws transfer more tension to substrate or anchor body.
Consider corrosion resistance and aesthetic considerations when choosing length and coating to prevent premature failure and visible degradation.
Material Thickness Checklist: Minimum Penetration Per Substrate
You’ll need to confirm the minimum embedment depth for the anchor you’re using so the screw achieves full holding strength. Check material-specific penetration guidelines—concrete, brick, drywall, and wood all require different depths.
If the substrate’s thickness is marginal, pick a longer anchor or a different fastening method to meet the recommended embedment.
Minimum Embedment Depth
When selecting a screw and anchor you’ll need to confirm the minimum embedment depth for the substrate so the fastener develops its rated holding strength. Different materials—drywall, concrete, brick, or wood—require specific penetration distances to resist pullout and shear.
You’ll also consider anchor corrosion and screw head types to guarantee longevity and proper seating.
- Verify depth per substrate
- Check corrosion protection
- Match head to fixture
Material-Specific Penetration
How deep should a screw go for each material? You should match material compatibility and installation precision: embed screws to recommended depths per substrate to guarantee strength and avoid damage.
| Substrate | Min Penetration | Note |
|---|---|---|
| Drywall | 1 in | Use anchors |
| Wood | 1.5x thickness | Grip fibers |
| Concrete | 1.5 in | Use masonry screws |
Rule of Thumb: Screw Length vs. Anchor Length
Although anchor length matters, the screw should extend beyond the anchor long enough to engage the fixture securely without bottoming out.
So pick a screw that’s at least as long as the anchor plus the fixture thickness.
Consider corrosion and matching materials to prevent anchor corrosion; verify screw threading fits anchor type.
- Choose compatible metals
- Account for fixture thickness
- Avoid over-penetration
How Much Screw Should Engage Anchor Threads (Recommended Depth)
You should aim for enough screw engagement that most of the threaded portion of the anchor is filled, typically about the same length as the anchor body.
Proper anchor thread penetration guarantees the load is shared between screw and anchor rather than stripping threads.
If you’re unsure, follow the anchor manufacturer’s recommended engagement depth for reliable holding power.
Screw Engagement Length
Wondering how deep the screw should bite into the anchor? You want sufficient engagement for strength without causing splitting or binding.
Typically, match anchor depth to screw thread length.
Consider material compatibility and corrosion resistance when selecting screw length and coating.
- Minimum engagement: full thread into anchor body
- Avoid protruding tip stress
- Verify anchor specs for recommended depth
Anchor Thread Penetration
How deeply should the screw threads engage the anchor for reliable holding? You should aim for at least the anchor’s full threaded length to be engaged, usually 75–100% of the anchor’s depth.
This ensures load distribution and avoids pullout. Also consider color coordination and aesthetic considerations when heads or exposed threads show; use shorter visible screws or caps to match finishes.
When a Screw Is Too Long: Common Failure Modes to Watch For
When a screw protrudes past its anchor, it can create several failure modes you should watch for: stripped threads, cracked or split substrate, reduced holding power, and exposed sharp points that catch or corrode.
Protruding screws cause stripped threads, substrate cracks, weakened hold, and hazardous exposed points—inspect and fix promptly.
You should monitor for screw corrosion and verify anchor color coding to match length and load, preventing damage and safety hazards.
- Pull-through risk
- Corrosion acceleration
- Surface snagging
When a Screw Is Too Short: Risks and Warning Signs
If your screw is too short it can pull out under load, leaving the anchor loose and the fixture unsecured.
You’ll often spot this by visible gaps, wobble, or the head sitting proud of the surface as the fastener bears unusual stress.
Watch for cracking or deformation around the anchor and any movement when you test the connection.
Screw Pullout Risk
A screw that’s too short can pull out under load, compromising the fixture and creating safety hazards. You should check anchor engagement, material strength, and corrosion resistance to prevent failure.
Also consider aesthetic considerations when replacing fasteners so visible fixes look intentional.
- Inspect anchor depth and screw length
- Test load’s direction and magnitude
- Replace corroded or undersized screws promptly
Visible Fastener Stress
Short screws that start to pull out often show visible stress before they fail, and you should watch for those signs. You’ll see bending, stripped heads, or gaps at the joint.
Check surface finish for corrosion and wear, and verify material compatibility to avoid galvanic issues.
Tighten or replace fasteners promptly to prevent progressive failure and surrounding damage.
Choosing Screw Diameter and Thread to Match the Anchor
1 key rule when matching screws to anchors is that the screw’s diameter and thread profile must engage the anchor’s internal geometry so you get full holding power without splitting the anchor or substrate.
You should pick matching thread type, avoid oversized diameters, and consider material pairing, tool maintenance, and aesthetic considerations to guarantee secure, neat installs.
- Match thread pitch
- Check anchor lip fit
- Use correct driver
Measuring Substrate and Object Thickness: Quick Method
When you’re prepping to install an anchor, measure the thickness of both the object and the substrate so the screw length gives full engagement without bottoming out or penetrating the other side.
Use a caliper or tape, add object thickness plus substrate depth and anchor embedment.
Verify anchor placement and material compatibility, subtract washer or plate thickness, then pick a screw that reaches but doesn’t exceed required depth.
Hanging a Shelf in Drywall: Recommended Anchors & Screw Lengths
When you hang a shelf in drywall, match the anchor’s required embedment depth to the screw length so the anchor can expand properly.
Use screws long enough to pass through the shelf and drywall and still seat fully into the anchor—usually drywall anchors need screws that extend at least as far as the anchor body.
If you’re using toggle or molly anchors, pick screws that reach the anchor’s gripping section without bottoming out.
Anchor Depth Vs Screw
A screw can extend beyond an anchor, but you should match lengths so the screw fully engages the anchor without bottoming out or leaving too much exposed thread.
You’ll guarantee a secure grip and consider corrosion resistance for longevity and aesthetic considerations for visible finishes.
- Match engagement depth to anchor design
- Avoid excess exposed thread
- Check material compatibility and finish
Screw Length Guidelines
If you’ve matched screw and anchor depths correctly, the next step is picking screw lengths that suit the type of drywall anchor and the load of your shelf.
Choose screws long enough to fully engage the anchor and penetrate backing if present.
Match anchor size and color coordination for quick identification.
Keep threads clean and inspect bits—tool maintenance prevents stripping and guarantees secure installs.
Mounting a TV on Plaster-and-Lath: Anchor and Screw Guidance
Because plaster-and-lath walls hide studs and can crumble around fasteners, you’ll need the right anchors and screws to secure a TV safely.
Use hollow-wall or toggle anchors rated for dynamic loads; avoid electrolyte pairs that cause anchor corrosion.
Match screws for screw material compatibility and length so anchor grip remains intact.
- Choose rated toggle anchors
- Use corrosion-resistant screws
- Verify screw length and thread engagement
Attaching Fixtures to Concrete Block: Practical Screw/Anchor Picks
When you’re fastening fixtures to concrete block, pick anchors and screws that match the block type and the load so the connection stays secure rather than pulling out or spalling the masonry.
Use sleeve or wedge anchors for solid block, sleeve or drop-in for hollow with inserts, and stainless or painted trim screws for corrosion resistance.
Consider color coordination and aesthetic design for visible hardware.
Modifying Anchors or Screws When Lengths Conflict (Cutting, Adapters)
If your screw sticks out past the anchor or the anchor’s too long for the fixture, you can trim metal screws with a proper cutter and file the burrs smooth to maintain fit and strength.
For anchors, you’ll need to shorten them only if the manufacturer allows—otherwise swapping to a shorter or flush-mounted type is safer than hacking them down.
When neither option works, consider length adapters or extension sleeves that let you match screw and anchor lengths without compromising hold.
Cutting Screws Safely
Wondering what to do when a screw is too long for its anchor? You can cut screws safely with proper PPE, a secure vise, and a file to deburr.
Color coordination of fasteners helps identify lengths; prioritize tool maintenance to keep blades sharp and clear.
Follow steps, avoid damaging threads, and test fit before final installation.
- Secure vise and eye protection
- Cut with a proper tool
- Deburr and test fit
Trimming Anchors Properly
After you’ve cut a screw to fit, you may still face an anchor that’s too long or too deep for the shortened fastener. Trimming anchors properly lets you match lengths without compromising holding power.
You’ll score and trim anchors flush, protect decorative finishes, and avoid crushing hollow wall sleeves.
Consider aesthetic considerations while testing pull strength and using the correct tools so the repair stays strong and looks clean.
Using Length Adapters
When anchor depth and screw length don’t match, length adapters give you a reliable way to bridge the gap without sacrificing hold or finish. You can cut screws or use extender sleeves, but always check material properties and corrosion resistance.
Match metals, consider load, and seal joints.
- Use threaded extenders matched to anchor
- Trim screws cleanly, deburr ends
- Protect exposed connections
Tools to Check Engagement: Drills, Depth Stops, Torque and Gauges
If you’re aiming for reliable anchor engagement, use the right measuring and control tools—drills with depth stops, calibrated torque drivers, and simple gauges—so you can place screws to the exact depth and tension required. Check material compatibility and corrosion prevention when selecting bits and fasteners. Use gauges, torque settings, and depth stops to prevent over- or under-engagement.
| Tool | Purpose | Tip |
|---|---|---|
| Drill | Hole depth control | Match bit size |
| Torque driver | Set tension | Use calibrated bits |
| Gauge | Measure engagement | Quick checks |
Inspecting and Testing Your Finished Installation
Ready to verify your work? Inspect anchor materials and check for proper seating, then test pull-out and torque. Watch for early signs of screw corrosion and looseness.
Verify anchors: confirm seating, inspect for cracks or corrosion, then apply steady pull and torque tests—re-tighten and retest as needed
- Apply steady pull or torque test to each fastener.
- Visually confirm anchor materials aren’t cracked or deformed.
- Re-tighten to specification and re-test if corrosion or movement appears.
Signs an Anchor-Screw Combo Needs Replacing
Because anchors and screws work as a system, you should replace the combo at the first clear sign of failure: visible corrosion, persistent looseness after re-torquing, cracked or deformed anchor material, or any pull-out movement during testing.
You’ll also swap units if anchor corrosion spreads, screw threading strips or galles, or you detect wobble, shifting under load, or corrosion flakes compromising grip.
Manufacturer Specs: When to Follow Them Exactly (And When Not To)
When you’re selecting anchors and screws, follow manufacturer specs for thread size, embedment depth, and maximum load ratings unless a specific site condition or code demands a tested deviation.
You should still account for electrical wiring proximity and paint compatibility when altering recommendations.
Don’t guess—document deviations and use tested alternatives.
- Verify embedment vs substrate
- Check corrosion and paint compatibility
- Respect wiring clearances
Cost vs. Safety: When to Upgrade Anchors or Screws
If your project sits near a high-traffic area or supports valuable equipment, you should lean toward higher-rated anchors or longer, stronger screws even if the cheaper option meets minimum specs. The extra cost is insurance against failure, downtime, and liability.
You’ll weigh budget, aesthetic considerations, and historical usage of materials, choosing upgrades when risk, accessibility, or replacement costs outweigh initial savings.
Top DIY Screw-Length Mistakes (And How to Fix Them)
Although it seems small, choosing the wrong screw length is one of the most common DIY errors and can ruin a project or create a safety hazard.
You’ll learn quick fixes: match screw length to anchor depth, check Tool compatibility, and factor Aesthetic considerations so heads don’t protrude.
Fixes are simple: trim screws, replace anchors, or pick different head styles.
- Protrusion
- Stripping
- Misalignment
Cheat Sheet: Common Anchors and Recommended Screw Lengths
Because every anchor type grips differently, you’ll save time and avoid mistakes by matching screw length to the anchor’s embedment and the material you’re fastening into. Use this cheat sheet to pick screws that respect cosmetic finishes and aesthetic considerations while securing load.
| Anchor Type | Recommended Screw Length |
|---|---|
| Plastic wall | Anchor length + screw into material |
| Toggle bolt | Anchor length + extra for grip |
| Masonry | Screw equals anchor embedment |
Final Practical Checklist Before You Tighten the Screw
Before you tighten the screw, run through a quick hands-on checklist to confirm alignment, anchor seating, and material readiness.
Before tightening, run a hands-on checklist to confirm alignment, anchor seating, and material readiness.
Check that anchor materials match load and wall type, verify screw coatings resist corrosion, and make certain the screw length won’t bottom out or leave gaps.
Then tighten steadily, feeling for secure engagement.
- Confirm anchor seating
- Verify screw length and fit
- Inspect coatings and materials
Frequently Asked Questions
Can a Screw Longer Than the Anchor Cause Concealed Wiring or Plumbing Damage?
Yes — if a screw extends beyond the anchor, you can puncture hidden wiring or cause plumbing damage; you should check wall cavity locations, use appropriate length screws, and turn power/water off when drilling to be safe.
Are Specialty Anchors Required for Heavy Outdoor or Marine Environments?
Yes—you’ll need specialty anchors for heavy outdoor or marine environments; choose corrosion-resistant materials for material compatibility, and follow proper installation techniques like through-bolting, sealed fasteners, and torque control to guarantee long-term performance.
How Does Screw Coating or Corrosion Affect Anchor Engagement Over Time?
Sure — you’ll love rust: as coatings fail, corrosion resistance drops and coating durability wanes, so screws seize or strip, reducing anchor engagement over time; you’ll need better protection or replace parts before strength evaporates.
Can Vibration-Prone Installations Tolerate Longer Screws With Anchors?
Yes — you can use longer screws in vibration-prone installations if you match installation techniques to anchor types, ensuring proper embedment, thread engagement, and lock washers or chemical adhesives so the assembly resists loosening under cyclic loads.
What Warranty or Liability Issues Arise From Altering Anchor/Screw Lengths?
Like walking a tightrope, you’ll void Warranty implications if you alter anchor/screw lengths against manufacturer guidance, and Liability concerns rise because you’re responsible for failures, repairs, or damages that stem from those unauthorized modifications.
Conclusion
Yes — a screw can be longer than the anchor, and often should be. Think of the anchor as a bridge and the screw as the traveler: the screw needs to go beyond the anchor and bite into the solid material for a secure hold. If it’s too short, the connection’s weak; too long, it can split the substrate or bottom out. Measure the anchor length, add required embedment into the base material, and choose a screw that achieves firm engagement without causing damage.