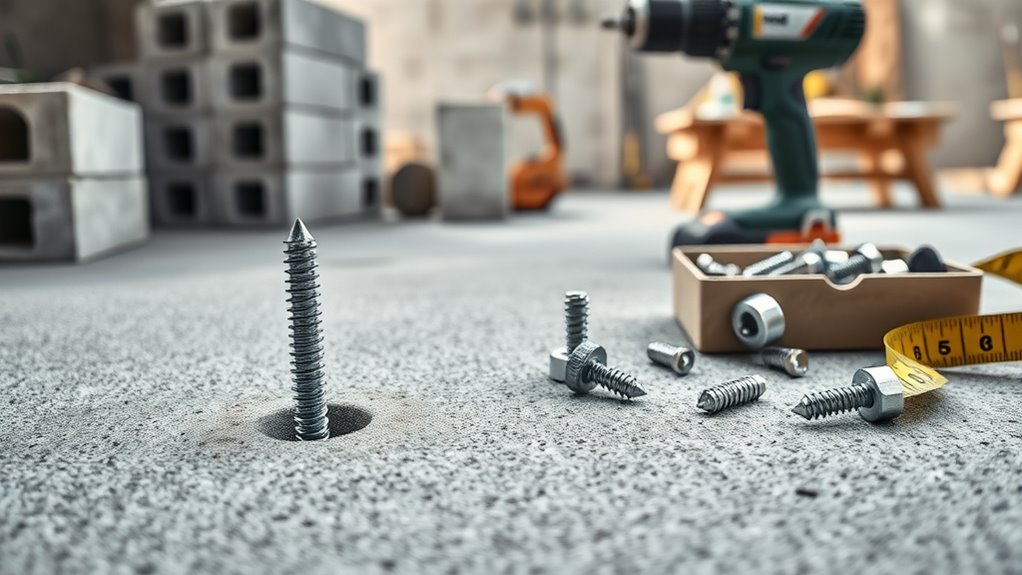
Are There Screws That Go Into Concrete
Yes — you can use purpose-built concrete screws that tap threads into predrilled holes in concrete, brick, or block to secure fixtures quickly and reliably. They’re ideal for light to medium loads, easy to install with a hammer drill and carbide bit, and remove cleanly for adjustments. For heavier or structural loads you’ll pick expansion or wedge anchors or bolts. Keep torque, embedment, and corrosion resistance in mind, and stick around to learn which fastener suits your project.
Who Asks “Are There Screws That Go Into Concrete?” And Why It Matters
Who wonders whether screws can go into concrete? You do if you’re planning fixtures, décor, or mounting heavy items and care about concrete aesthetics or decorative finishes.
You want secure anchors without marring surfaces, matching textures, or hiding hardware. Professionals, DIYers, and designers all ask because function must meet appearance.
Knowing options helps you balance strength, placement, and visual outcome.
Quick Answer: Do Concrete Screws Work And When To Use Them?
Yes — concrete screws work well for fastening light to medium loads into concrete, block, or brick when you need a fast, removable anchor.
They’ll fail if you try heavy structural loads, use them in cracked or spalling material, or expect vibration-resistant performance without the right type; in those cases consider anchors, expansion bolts, or epoxy-set studs.
Before you pick one, match the screw type and size to the load, substrate condition, and whether you need corrosion resistance.
When To Use
When you need a reliable, direct-fastening solution into solid masonry, concrete screws deliver—sooner and with less prep than anchors that need adhesives or expansion. Use them for fixtures, shelving, conduit, Decorative finishes, and Historical restoration where vibration resistance and easy removal matter.
| Task | Setting | Benefit |
|---|---|---|
| Shelves | Garage | Strong |
| Conduit | Commercial | Secure |
| Fixtures | Residential | Quick |
| Restoration | Historic | Reversible |
Limitations And Alternatives
Concrete screws work very well for many direct-fastening jobs, but they aren’t the best choice in every situation. You’ll face limits with vibration, heavy loads, or poor surface preparation.
For high loads or invisible finishes, consider anchors, epoxy-set bolts, or through-bolting. Also weigh aesthetic considerations—anchor plates or flush anchors often look better.
Match method to load, exposure, and appearance.
What a Concrete Screw Is: Thread, Material, And Coating
You’ll want to know how thread profiles affect grip and installation in concrete. Consider the material—hardened steel, stainless options, or specialty alloys—for strength and corrosion resistance.
Also weigh coating choices like zinc or epoxy for added protection in different environments.
Thread Types Explained
Because the threads, material, and coating each play a specific role, a concrete screw’s performance depends on more than just its length and head style.
You’ll choose coarse, aggressive threads for masonry bite or fine threads for precision.
Consider decorative finishes and environmental impacts when selecting coatings.
Match thread type to load, drill size, and substrate to guarantee secure anchoring and durable installation.
Material Composition Options
When selecting a concrete screw, consider three interconnected factors—core material, thread design, and protective coating—that collectively influence durability, rust resistance, and long-lasting performance. You’ll weigh steel grades, stainless varieties, and thread shape against surface preparation requirements and preferred aesthetic outcomes.
| Element | Consideration |
|---|---|
| Core | Strength, ductility |
| Thread | Grip, embedment |
| Finish | Corrosion, look |
Protective Coating Choices
Having picked a core and thread that match your load and embedment needs, you now need to think about coatings that protect that metal in wet, salty, or chemically active environments.
You’ll choose galvanized, stainless, or specialized polymer finishes based on corrosion risk, surface preparation, and weather considerations.
Inspect coating uniformity, avoid damage during installation, and replace compromised fasteners promptly.
Masonry Fasteners Overview: Screws, Anchors, And Bolts
Although masonry work feels permanent, you’ll still need the right fasteners to secure fixtures safely to concrete, brick, or block.
Even solid masonry needs the correct fasteners to hold fixtures securely to concrete, brick, or block.
You’ll choose between screws, anchors, and bolts based on load, hole type, and substrate.
Prioritize surface preparation and avoid damaging decorative finishes.
Use anchors for heavy loads, bolts for structural connections, and specialized screws for lighter, nonstructural attachments.
Masonry Screws (Tapcon-Style) Explained
You’ll learn what makes Tapcon-style masonry screws unique, including their threads and material suited for concrete.
I’ll cover the installation requirements you need to follow—drill size, hole depth, and torque—to get reliable hold.
Finally, we’ll talk about removal and whether you can reuse them safely.
Tapcon Screw Basics
When you need a fast, reliable way to anchor into concrete or masonry, Tapcon-style screws give you a simple solution: they’re hardened, threaded fasteners designed to cut their own mating thread into drill-made holes in solid substrates.
You’ll value surface preparation and aesthetic considerations. Use them when you want corrosion-resistant, removable, or vibration-resistant anchors:
- Corrosion resistance
- Removability
- Vibration holding
Installation Requirements
How do you guarantee a Tapcon installs properly? You’ll clean the hole and follow surface preparation steps: mark, drill to correct depth, blow out debris, and use the right diameter bit.
Drive screws flush without over-torquing to protect threads and concrete.
Plan fastener spacing, embedment depth, and consider aesthetic finishes so visible heads match your project.
Removal And Reuse
If you need to remove a Tapcon-style masonry screw, start by backing it out straight with the correct driver to avoid damaging the hole or the screw head.
Then inspect recess and threads for reuse.
Consider surface finishing needs and environmental impact when deciding to reuse or replace.
- Check thread integrity
- Assess hole wear
- Consider corrosion and finish
Sleeve Anchors: When To Choose Them
Because sleeve anchors expand tightly against the hole walls, they’re a go-to choice when you need a strong, vibration-resistant hold in solid concrete or masonry.
You’ll pick them for fixtures near concrete polishing or decorative finishes where minimal movement matters.
Use sleeve anchors for medium loads, fixtures with through-bolting, and applications where removal might be occasional; they balance ease of installation with reliable pullout strength.
Wedge Anchors: For Heavy, Load-Bearing Attachments
When you need maximum holding power for structural or heavy machinery mounts, wedge anchors offer the heavy-duty load capacity you’ll depend on.
You’ll install them by setting the anchor into a predrilled hole and tightening to the specified torque so the wedge locks firm against the concrete.
Pay close attention to the manufacturer’s torque and embedment specs to guarantee full strength and safety.
Heavy-Duty Load Capacity
Looking for an anchor that can handle serious weight? You’ll choose wedge anchors rated for heavy-duty load capacity, factoring surface treatments and environmental considerations to prevent corrosion and strength loss.
Match anchor diameter and embed depth to load types.
Consider:
- Material grade and coating
- Concrete condition and edge distances
- Dynamic versus static loads
Pick anchors tested for your specific application.
Installation And Torque
If you’re installing wedge anchors for heavy, load-bearing attachments, tighten to the manufacturer’s specified torque and verify embedment depth to guarantee full expansion and clamp-down against the concrete.
You’ll prep the hole and surface preparation carefully, remove dust, and use calibrated torque tools.
Check alignment, protect aesthetic finishes with caps or sealant, and retorque after initial load or thermal cycling.
Drop-In Anchors: Flush Mounts And Hollow Concrete
Although drop-in anchors sit flush with the concrete surface, they deliver strong, concealed holding power for fixtures where a low profile matters. You’ll set them in drilled holes, expand with a setting tool, and attach bolts without protrusion.
Consider concrete coloring and surface sealing to preserve finish.
Benefits include:
- Clean, unobtrusive appearance
- High shear strength
- Suitable for hollow concrete sections
Plastic And Nylon Anchors For Light-Duty Fixtures
When you’re hanging light fixtures or small shelves, plastic and nylon anchors can be the simplest choice—pick one rated for the material and the weight you expect.
I’ll walk you through the installation step-by-step so you know which drill bit to use, how deep to set the anchor, and how to seat the screw properly.
Finally, we’ll cover weight and load limits so you don’t overload the anchor or risk a failure.
Choosing The Right Anchor
Curious which anchor will hold your light fixture securely without overkill? You’ll pick based on load, substrate, and simple Concrete mixing or surface preparation reminders.
Choose plastic or nylon when mounting lightweight items; they’re affordable and rustproof.
- Use nylon for slight vibration
- Use plastic for dry, stable concrete
- Match anchor size to screw and fixture weight
Installation Step-by-Step
Ready to install your light fixture? You’ll mark, drill, and clean the hole, insert the plastic or nylon anchor, then drive the screw until snug. Choose decorative finishes and aesthetic options for visible anchors.
| Step | Tool | Tip |
|---|---|---|
| Mark | Pencil | Measure twice |
| Drill | Mason bit | Keep steady |
| Insert | Hammer | Tap flush |
Weight And Load Limits
How much weight can plastic or nylon anchors actually hold? You’ll typically trust them for light-duty loads—small shelves, pictures—depending on concrete aesthetics and surface textures. Consider capacity, embedment depth, and anchor condition:
- Up to about 25–75 lbs in good concrete
- Reduced capacity on rough or crumbly surfaces
- Use larger anchors or metal alternatives for safety margins
Drive, Hammer-Set, And Hollow-Wall Anchors Explained
When you’re fastening into concrete or hollow walls, choosing the right anchor type matters because each—drive, hammer-set, and hollow-wall—works differently and suits specific loads and materials.
You’ll use drive anchors for light loads, hammer-set for medium-duty in solid substrates, and hollow-wall anchors for drywall or cavity spaces.
Also consider color options and aesthetic finishes when visible to match your project.
Anchoring Into Solid Concrete, Concrete Block, And Brick: Key Differences
Because solid concrete, concrete block, and brick have different strengths and hollow spaces, you’ll pick anchors and installation methods that match each material’s structure.
Because concrete, block, and brick differ, choose anchors and methods suited to each material’s structure.
Consider concrete curing and thorough surface prep before drilling.
Match anchor type to substrate and cavity.
Use correct drill bits, depth, and cleaners.
- Solid: expansion anchors for full depth
- Block: use grout or through-bolt
- Brick: anchor into header bricks only
Shear Vs. Pullout: How Load Type Affects Fastener Choice
Although both shear and pullout involve loads on a fastener, they act in very different directions. You’ll choose anchors differently depending on which force dominates.
You prioritize pullout resistance for tensile loads and shear capacity for lateral loads.
Consider surface preparation to guarantee proper contact, and pick systems with fastening flexibility—different anchor types, materials, and orientations—so the chosen fastener matches the dominant load.
How To Size Concrete Screws: Diameter And Embedment Depth
Now that you’ve matched load type to anchor style, you need to size the screw for the job—the two key numbers are diameter and embedment depth.
Choose larger diameters for higher shear; deeper embedment increases pullout resistance.
Larger diameters resist shear better; increasing embedment depth boosts pullout strength for secure anchoring.
Consider surface preparation and avoid drilled areas with concrete stains.
- Match diameter to load chart
- Verify minimum embedment depth
- Avoid damaged or stained holes
Choosing Screw Length For Fixture Thickness
When you pick a screw length, add the fixture thickness to the required embedment depth and allow a small margin for any washers or surface irregularities. This guarantees the screw fully engages the concrete without bottoming out or leaving insufficient thread in the anchor.
Check surface preparation so anchors seat flush, and choose length that preserves aesthetic finishes while providing full load capacity and corrosion allowance.
Drill Bits And Hole Diameter For Concrete Screws
You’ll need the correct drill bit size to match the screw’s outer thread so the anchor bites properly without cracking the concrete.
Make your pilot hole slightly deeper than the screw’s embedment to clear dust and allow full seating.
Use a carbide-tipped masonry bit or SDS bit for clean holes and faster drilling in concrete.
Correct Drill Bit Size
Because concrete screws cut their own threads in the substrate, picking the right drill bit diameter is critical for fit and holding power. Too small and the screw won’t reach depth or will bind. Too large and the threads won’t bite.
You should match manufacturer specs, consider surface preparation and decorative finishes, and:
- Use the recommended carbide masonry bit
- Check bit wear regularly
- Trial-fit in scrap concrete
Pilot Hole Depth
If you drill too shallow, the screw won’t reach full embedment and will strip or pull out.
If you go too deep, you’ll reduce clamping force and waste material.
You should match pilot depth to screw length so threads fully engage concrete without bottoming out.
Good surface preparation prevents cracking and guarantees consistent depth.
Account for aesthetic considerations by avoiding excess recessed holes or protruding screw ends.
Bit Types For Concrete
Which drill bit should you pick for concrete screws depends on material, screw size, and whether you need a clean, precise hole or fast removal of dust.
Use carbide-tipped masonry bits for hard concrete; SDS-plus for speed and dust removal; and smaller diamond bits for decorative finishes or precise aesthetic considerations.
Choose hole diameter matching screw anchor specs to guarantee grip and alignment.
- Carbide-tipped masonry
- SDS-plus
- Diamond bits
Pre-Drilling: Hammer Drill Vs. Rotary Hammer
When you’re pre-drilling into concrete, choosing between a hammer drill and a rotary hammer comes down to matching the tool’s impact mechanism and power to the job’s size and frequency.
You’ll pick a hammer drill for light tasks that preserve concrete aesthetics and reduce noise.
Choose a rotary hammer for tougher jobs to minimize time and environmental impact by avoiding repeated passes and excessive tool wear.
Step-By-Step: Installing A Concrete Screw In Solid Concrete
You’ll want the right tools and materials on hand—hammer drill or rotary hammer, carbide masonry bit, concrete screws, safety gear, and a vacuum or brush.
Start by accurately drilling the hole to the recommended diameter and depth. Clean out the dust, then position the screw.
Finally, set the screw flush using the proper bit and torque, checking alignment as you go.
Tools And Materials
Before you start drilling, gather the right tools and materials so the job goes smoothly and safely. You’ll need quality concrete screws, anchors, and PPE; consider nearby concrete staining or decorative finishes to avoid damage.
Prepare:
- Hammer drill and carbide masonry bit
- Vacuum or blow-out bulb for dust
- Corrosion-resistant screws and a torque-rated driver
Check compatibility with your finish before fastening.
Drilling The Hole
Ready to drill? Mark and clamp, choose a carbide masonry bit matching the screw diameter, and drill at low speed with steady pressure.
Clear dust with a brush or compressed air between passes to guarantee a clean hole for decorative finishes or waterproof coatings nearby.
Keep the drill perpendicular, avoid overheating, and confirm depth with a tape or stop before moving on to setting the screw.
Setting The Screw
How do you set the screw without damaging the hole or the concrete? You’ll align, start slowly, and finish firmly to protect concrete aesthetics and guarantee moisture resistance. Use a driver with clutch, avoid over-torquing, and seat flush. Follow these steps:
- Start with a low RPM and steady pressure
- Check alignment, then increase torque gradually
- Seat screw flush, confirm seal and finish
Step-By-Step: Installing Fasteners In Hollow Concrete Block
When you’re fastening into hollow concrete block, you’ll work methodically: choose the right anchor, mark and drill accurately, and confirm the anchor seats securely in the void or shell so your load is supported.
Insert sleeve or toggle anchors, expand per instructions, and tighten while checking alignment.
Protect surrounding surfaces if you’re prepping for concrete polishing or decorative finishes to avoid chips or stains during installation.
Torque And Speed: Avoid Stripping And Fractures
After seating anchors in hollow block, pay close attention to the torque and drill speed you use—too much and you’ll strip threads or snap screws, too little and anchors won’t bite properly.
Balance prevents damage to block and preserves concrete artistry and decorative finishes.
- Start with manufacturer torque specs
- Use controlled, low RPM for masonry
- Step up torque gradually to test grip
Corrosion Resistance: Coatings, Stainless Options, And Environments
Because concrete and its environment vary so much, you’ll pick coatings and stainless grades that match exposure and longevity needs. You’ll consider corrosion prevention and environmental factors: epoxy or hot-dip coatings for mild settings, 316 stainless for coastal or chemical exposure, and routine inspection. Choose based on lifespan and budget; prioritize higher-grade stainless where replacement is difficult.
| Option | Best Use |
|---|---|
| Epoxy | Indoor/mild |
| Hot-dip | Urban/moderate |
| 316 SS | Coastal/chemical |
Removing And Replacing Concrete Screws Safely
If a screw’s stuck, damaged, or corroded, you’ll remove it carefully to avoid widening the hole or cracking the concrete. Use correct tools, work slowly, and avoid levering.
After extraction, clean the hole and choose a replacement that suits load and color matching for aesthetic considerations.
- Use proper extractor or reverse drill
- Re-tap or use epoxy for fit
- Inspect surrounding concrete
Common Installation Mistakes That Cause Failure
When you pick the wrong anchor for the load or concrete type, the screw can fail under stress.
If you don’t clean out the hole thoroughly, dust and debris will prevent full engagement and reduce holding power.
Addressing anchor selection and hole cleaning up front prevents most installation failures.
Improper Anchor Selection
Although it might seem like any anchor will do, choosing the wrong type or size for your concrete application is one of the fastest ways to invite failure. You should match anchor capacity, concrete condition, and even Decorative finishes or Aesthetic options to the load and exposure.
Consider these points:
- load direction and weight
- embedment depth and diameter
- corrosion resistance and finish
Insufficient Hole Cleaning
Ever tried driving an anchor into a dusty, debris-filled hole and wondered why it didn’t hold? You must clean drill holes thoroughly—brush, blow, and vacuum—to guarantee full contact and proper torque.
Poor surface preparation causes anchors to slip or break. Don’t skip cleaning for quick fixes; it harms performance and can ruin aesthetic considerations like flush seating or neat finishes, increasing callbacks and repairs.
How To Avoid Cracking Concrete When Anchoring
If you want anchors to hold without cracking the slab, start by choosing the right fastener and drilling technique for the concrete’s strength and thickness.
You’ll protect concrete staining and decorative finishes by minimizing vibration and keeping drill bits sharp.
- Use correct bit size and slow feed.
- Clear dust fully between passes.
- Space anchors from edges and joints to reduce stress.
How To Test Pullout Capacity On-Site (Simple Methods)
When you need to verify anchor performance on-site, simple pullout checks give a fast, practical measure of capacity without waiting for lab tests.
You can tension a screw with a calibrated wrench or portable pull tester, note slip or failure, and compare to expected values.
Record results, avoid damaging decorative finishes or concrete aesthetics, and repeat tests in representative locations for reliable assessment.
Cost Comparison: Concrete Screws Vs. Anchors Vs. Bolts
After confirming anchor performance on-site, you’ll want to weigh the costs of concrete screws, expansion anchors, and cast-in bolts to pick the most economical option for your project.
Consider price, lifecycle, and broader effects like Historical significance and Environmental impact:
- Screws: lower upfront, quicker install, recyclable.
- Expansion anchors: mid-cost, durable in retrofit jobs.
- Cast-in bolts: higher initial cost, long-term stability.
Best Concrete Screws And Anchor Brands To Consider
Although you’ll find many manufacturers, focus on brands with proven testing, clear load tables, and good availability so you can match fasteners to your concrete type and load demands.
Choose reputable makers offering stainless or coated screws, clear specs, and options with decorative finishes if appearance matters.
Also check environmental impact statements, warranty support, and distributor reach so replacements and data are accessible.
Code And Safety Basics For Structural Anchoring
Because structural anchors carry life-safety loads, you need to follow building codes, manufacturer instructions, and tested load tables exactly to guarantee secure, compliant installations.
You’ll verify substrate condition, use approved fasteners, and avoid decorative finishes that mask defects.
Consider chemical adhesives only where listed and tested.
Key points:
- follow tested load tables
- inspect substrate and finish
- document installation per code
When To Call A Professional Anchor Installer
Knowing the codes and inspecting substrates gets you only so far; some anchoring jobs are best left to a pro. If loads, corrosion, or aesthetics tied to garden design or surrounding paint colors matter, call an installer. They verify load tables, choose anchors, and prevent costly failures.
| Concern | When to call |
|---|---|
| Heavy loads | Yes |
| Corrosion risk | Yes |
| Aesthetic match | Yes |
| Structural unknowns | Yes |
Quick Decision Flow: Choose The Right Concrete Fastener
When you need to pick a concrete fastener quickly, follow a simple flow. Assess load, choose anchor type, and consider substrate condition. Protect visible surfaces if you plan concrete stain or a decorative finish.
Quick steps:
- Light load, drywall or thin fixtures: use masonry screws.
- Medium/heavy load: choose expansion or wedge anchors.
- Cosmetic areas: prefer flush or low-profile anchors.
Practical Checklist: Tools, Bits, And Materials To Have Ready
If you want the job to go smoothly, gather the right tools, bits, and materials before you drill—hammer drill, the correct masonry bits, anchors sized for your load, a punch or awl to mark holes, and a vacuum or brush to clean dust. You’ll also plan for decorative finishes and consider environmental impact.
| Tool | Purpose | Tip |
|---|---|---|
| Hammer drill | Drilling | Use proper speed |
| Masonry bits | Hole size | Match anchor |
| Anchors | Hold load | Check ratings |
| Vacuum | Dust removal | Improve bonding |
| Awl | Marking | Prevent wander |
Frequently Asked Questions
Can Concrete Screws Be Used in Mortar Joints Instead of Solid Units?
Yes — you can, but you’ll risk reduced holding strength and potential cracking; you’ll need to check mortar compatibility and expect weaker surface adhesion, so you’ll often prefer anchors designed for joints or retrofit chemical anchors instead.
Can Concrete Screws Be Installed Underwater or in Constantly Wet Conditions?
Yes—you can install concrete screws underwater or in constantly wet conditions if you use corrosion-resistant coatings or stainless steel, but you’ll need to verify reduced load capacity over time and follow manufacturer instructions for wet installation.
Are There Self-Tapping Concrete Screws That Eliminate Pre-Drilling?
No — you won’t find true self-tapping concrete screws that skip pre-drilling; you’ll need drilled holes. Choose coated screws for corrosion resistance and verify manufacturer-rated load capacity to guarantee reliable anchoring in wet or marine environments.
Can Concrete Screws Be Used for Seismic or Dynamic Load Applications?
Yes — you can use concrete screws for seismic or dynamic load applications, but you’ll need to verify material compatibility, confirm tested load capacity, use approved installation methods, and follow relevant codes and engineering specifications.
How Do High Temperatures (Fire) Affect Concrete Screw Performance?
Like a strained bridge cable, you’ll see thermal expansion and material degradation reduce concrete screw strength during fire; you’ll get loss of preload, corrosion acceleration, and possible pullout unless you use fire-rated anchors and protective measures.
Conclusion
Yes — concrete screws work when you need a direct, reliable hold without using bulky anchors. They’re like short, sharp roots that bite into masonry: choose the right type, pilot-drill with the correct bit, and tighten to the recommended torque. For heavy or safety-critical loads, use proper anchors or call a pro. Keep dust-free holes, the right length and coating, and the right tools on hand to guarantee a durable, safe installation.